Categories
In this article
- Why backup Salesforce metadata?
- Package Manager
- Change sets
- Sandbox refresh
- Force.com/Ant Migration Tool
- Native Backup and Restore
- Salesforce metadata backup using SysCloud
Admin’s Guide to Salesforce Metadata Backup
16 May 2022
20 minutes
Anju George
Article at a glance
- Native Salesforce tools, like change sets and sandboxes, are complex, time-consuming, and do not support all metadata types, making them unreliable for comprehensive backup.
The native Backup and Restore tool cannot restore Salesforce metadata, leading to potential data loss if metadata is corrupted or deleted. What is the solution?
Read more
Salesforce is the world’s leading enterprise software company that provides Customer Relationship Management (CRM) services to over 150,000 businesses globally. Given the large amount of business-critical data that is stored on Salesforce, it is the responsibility of IT administrators to ensure that Salesforce is backed up regularly so that business data is always available. Here is an extract from Salesforce documentation highlighting the importance of backing up your Salesforce data.
Even with the best of intentions, users and administrators have been in situations where they have either deleted large amounts of data or have modified records, only to later realize that a mistake was made. With tools like the data loader, it is very easy to mass delete or update records and a simple mistake in your source file or field mapping could spell disaster for your data. It is recommended that you keep a regular backup of your data and do a manual point-in-time backup before you proceed with any major data project within your org.

1. Why backup Salesforce metadata?
Metadata protects your organization’s customizations Salesforce has countless configuration and customization options. Organizations continually evolve by adding and altering metadata to make customizations that align with its requirements. It would take a long time to rebuild all the metadata manually, causing significant and costly business disruption.
You need metadata to restore Salesforce data successfully Without metadata backup, you will not be able to restore data with object relationships intact. For example, if the metadata that describes your fields and objects is lost or corrupted, you will not be able to restore lost records to those fields and objects.
Metadata protects your data Metadata types such as Permissions and Profiles are important because they control who can access different datasets within your organization. In May 2019, a substantial number of businesses discovered that their Salesforce permissions metadata had been compromised. As a result, every user in their orgs had been given access to all the Salesforce data. Businesses that had Salesforce metadata backup in place were able to protect their data by restoring their permissions model quickly.
2. Salesforce metadata backup using Package Manager
2.1. Required editions and user permissions:
Available in: Developer, Enterprise, Performance, Professional, and Unlimited editions
User permissions needed: Create AppExchange Packages and Manage Users
Step 1: Go to Setup, enter Package Manager in the Quick Find box, and select Package Manager.
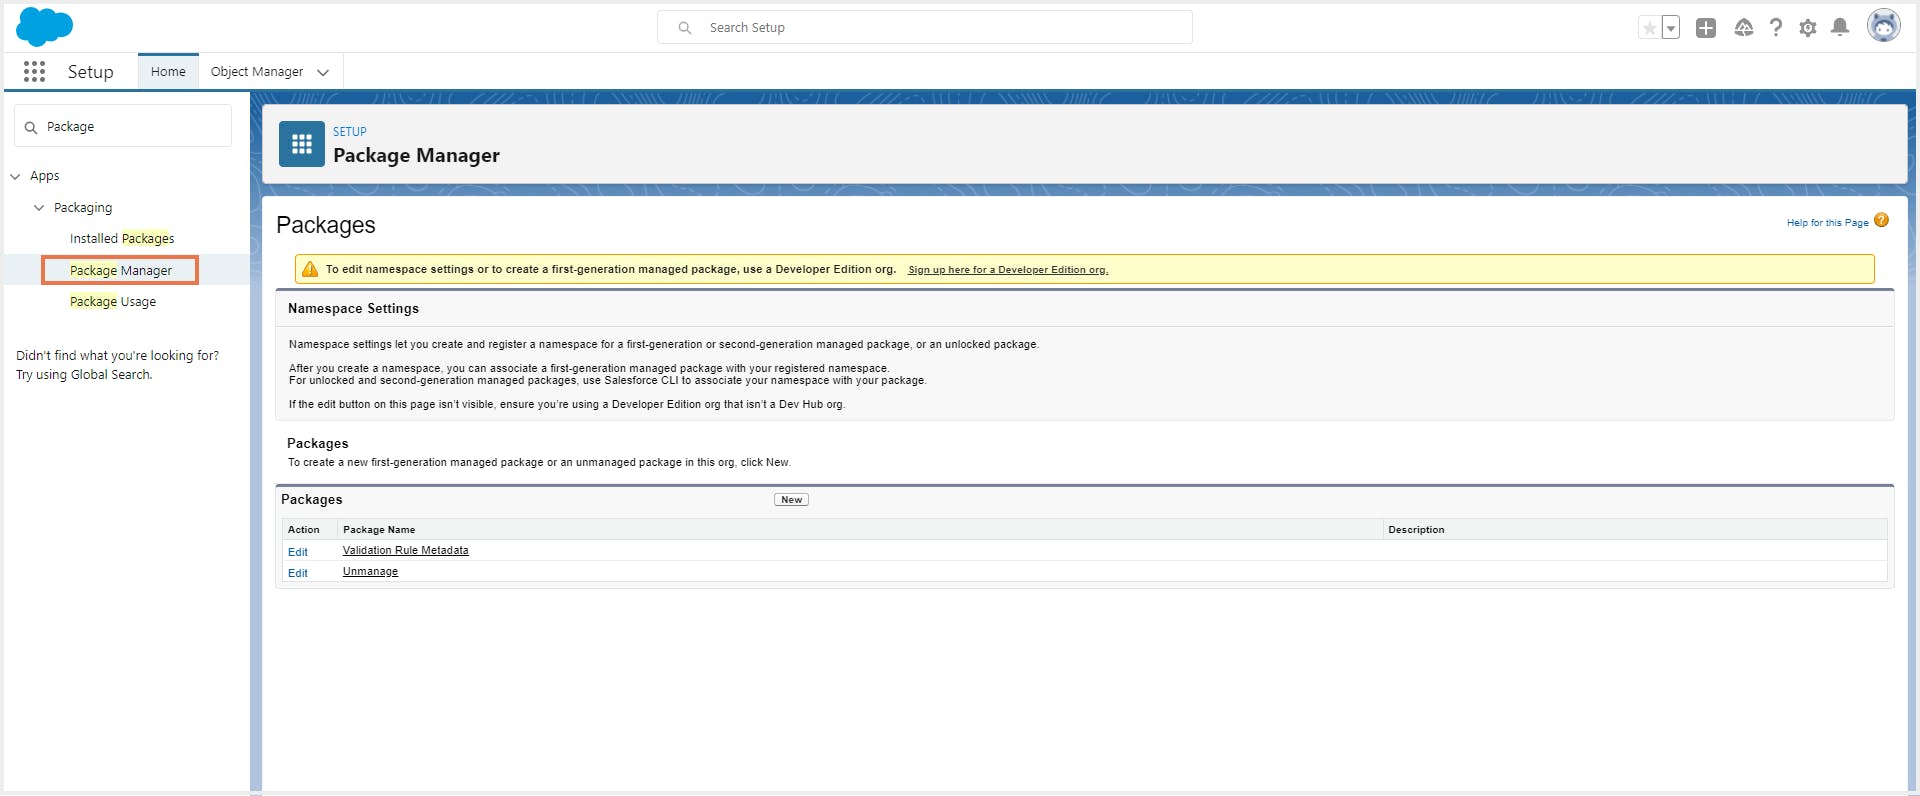
Step 2: Select New, name the package, and click Save.
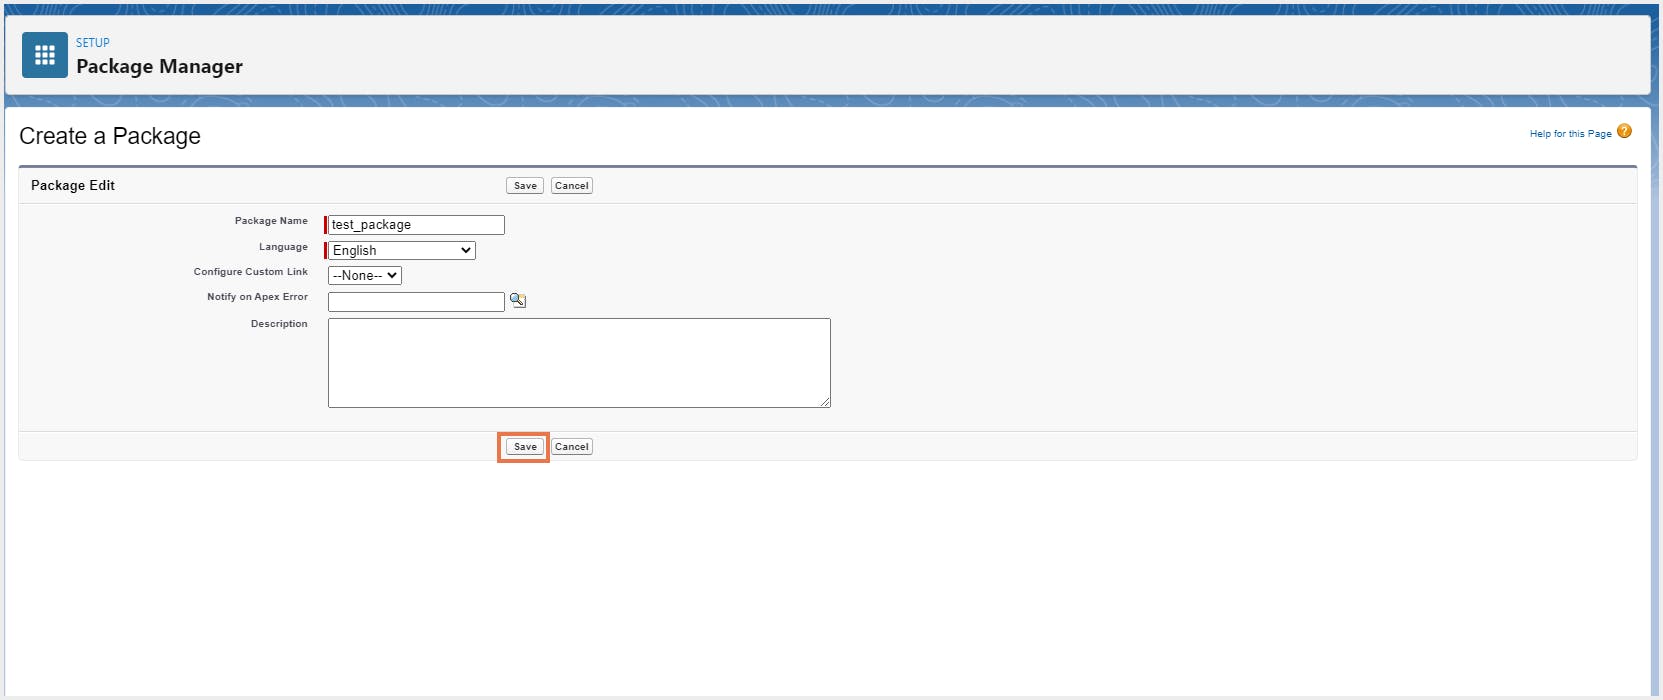
Step 3: Click on the Add button on the Components tab.
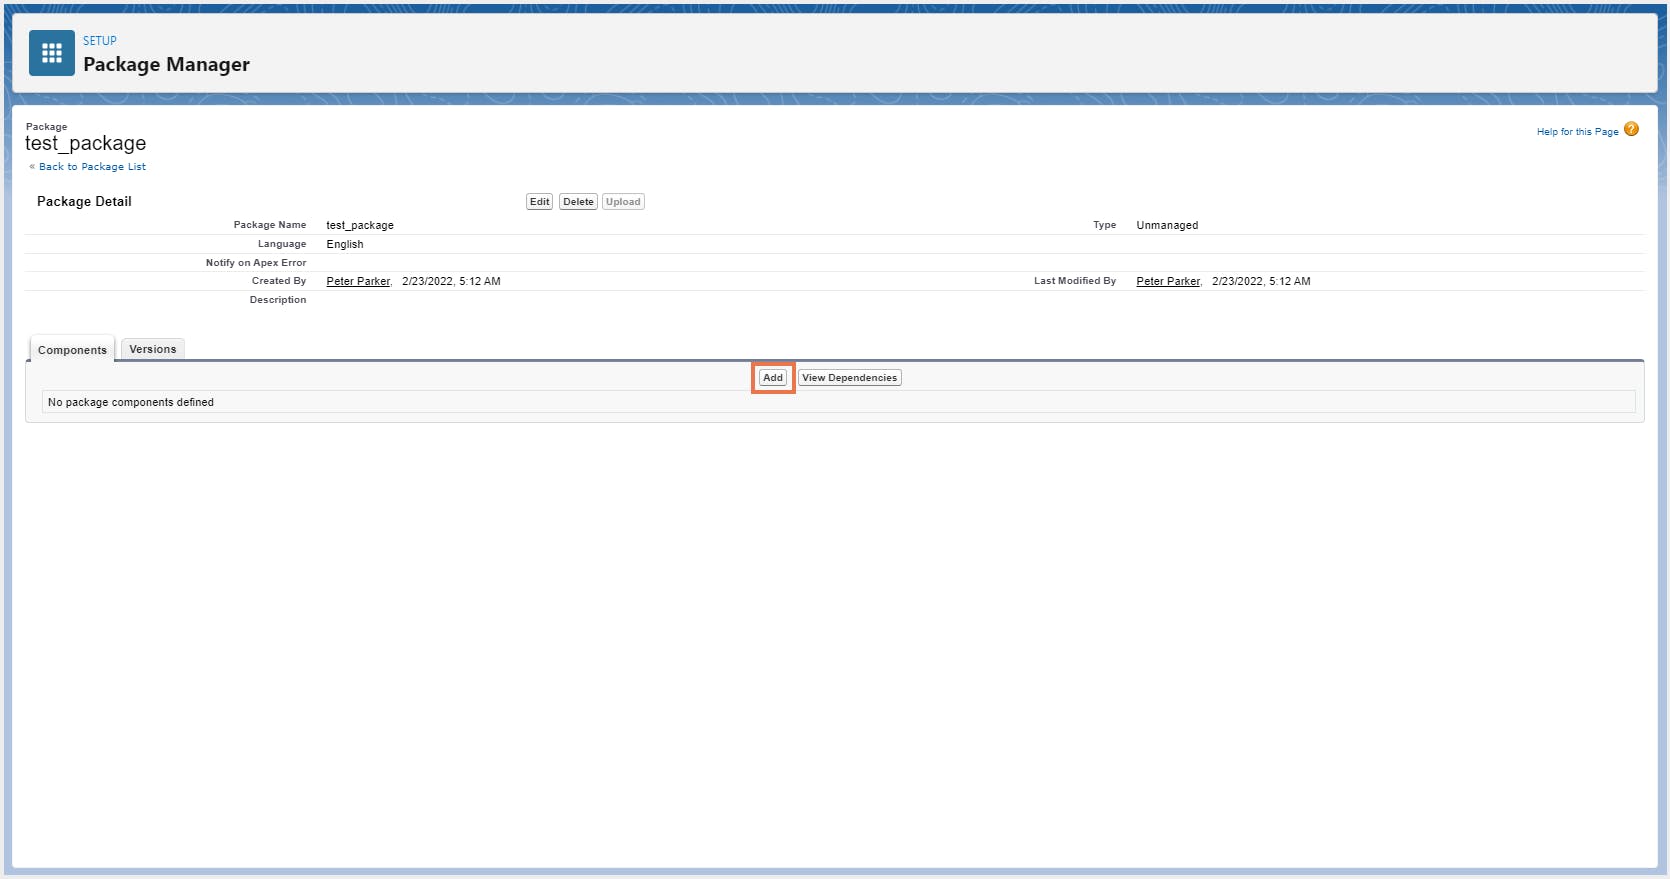
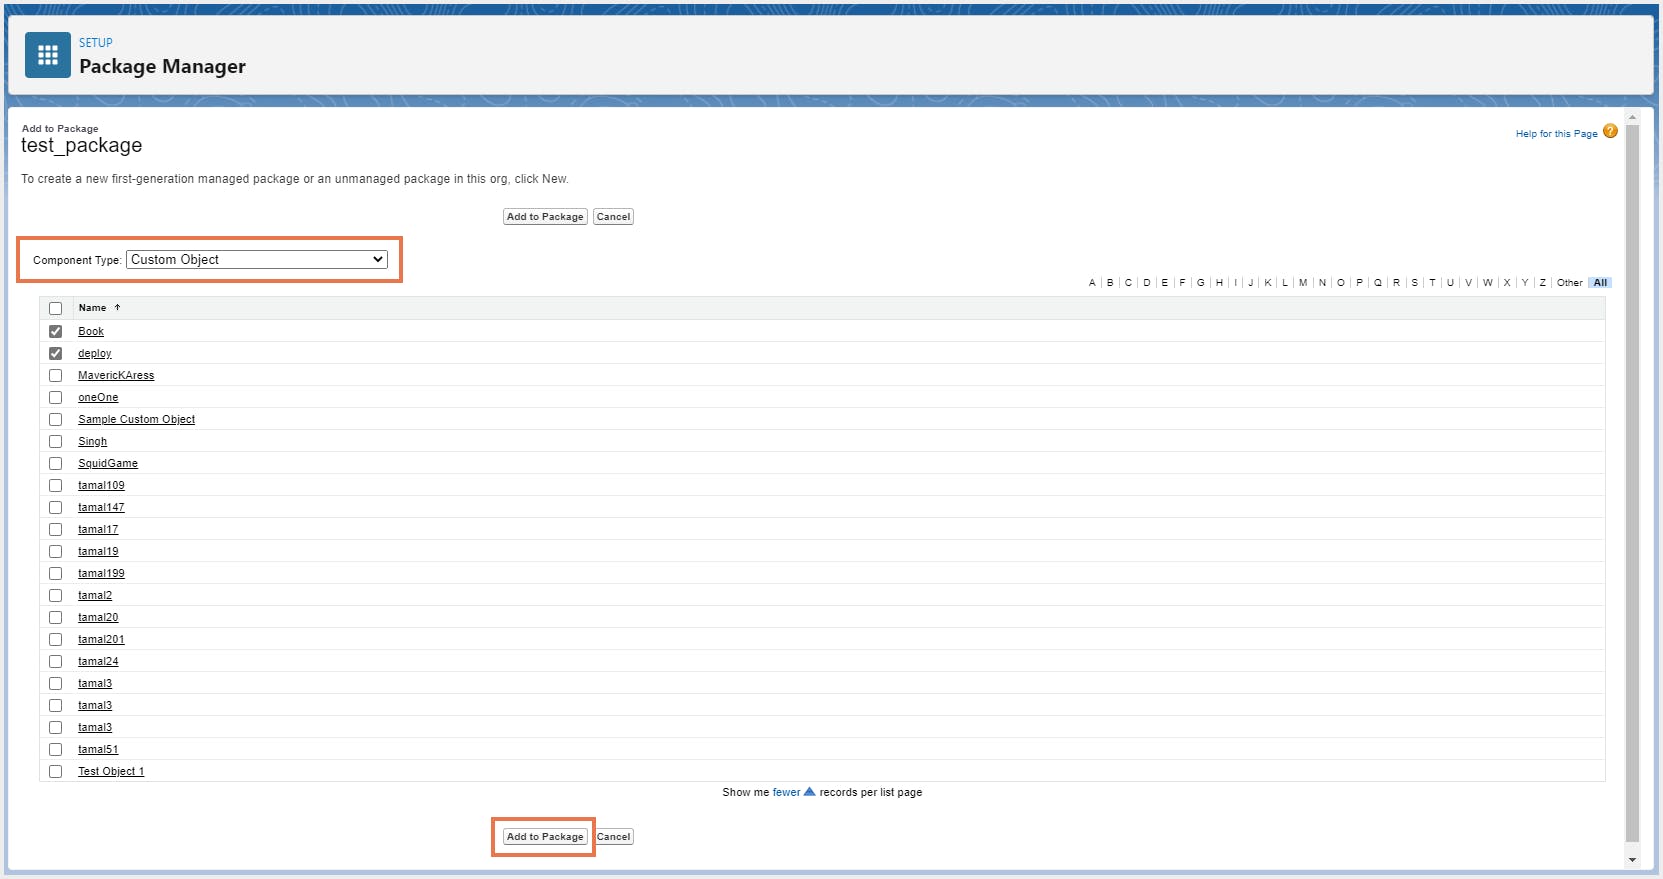
Step 4: In the Component Type dropdown list, select the type of metadata you want to include in your backup, check the boxes next to the ones you need to retrieve, and click Add to Package. Repeat this for each metadata type you need to include in your backup.
Step 5: To finish creating this unmanaged package, click Upload. This will prompt you to fill in the details about the package before the upload. These settings determine what requirements must be met to install the package.
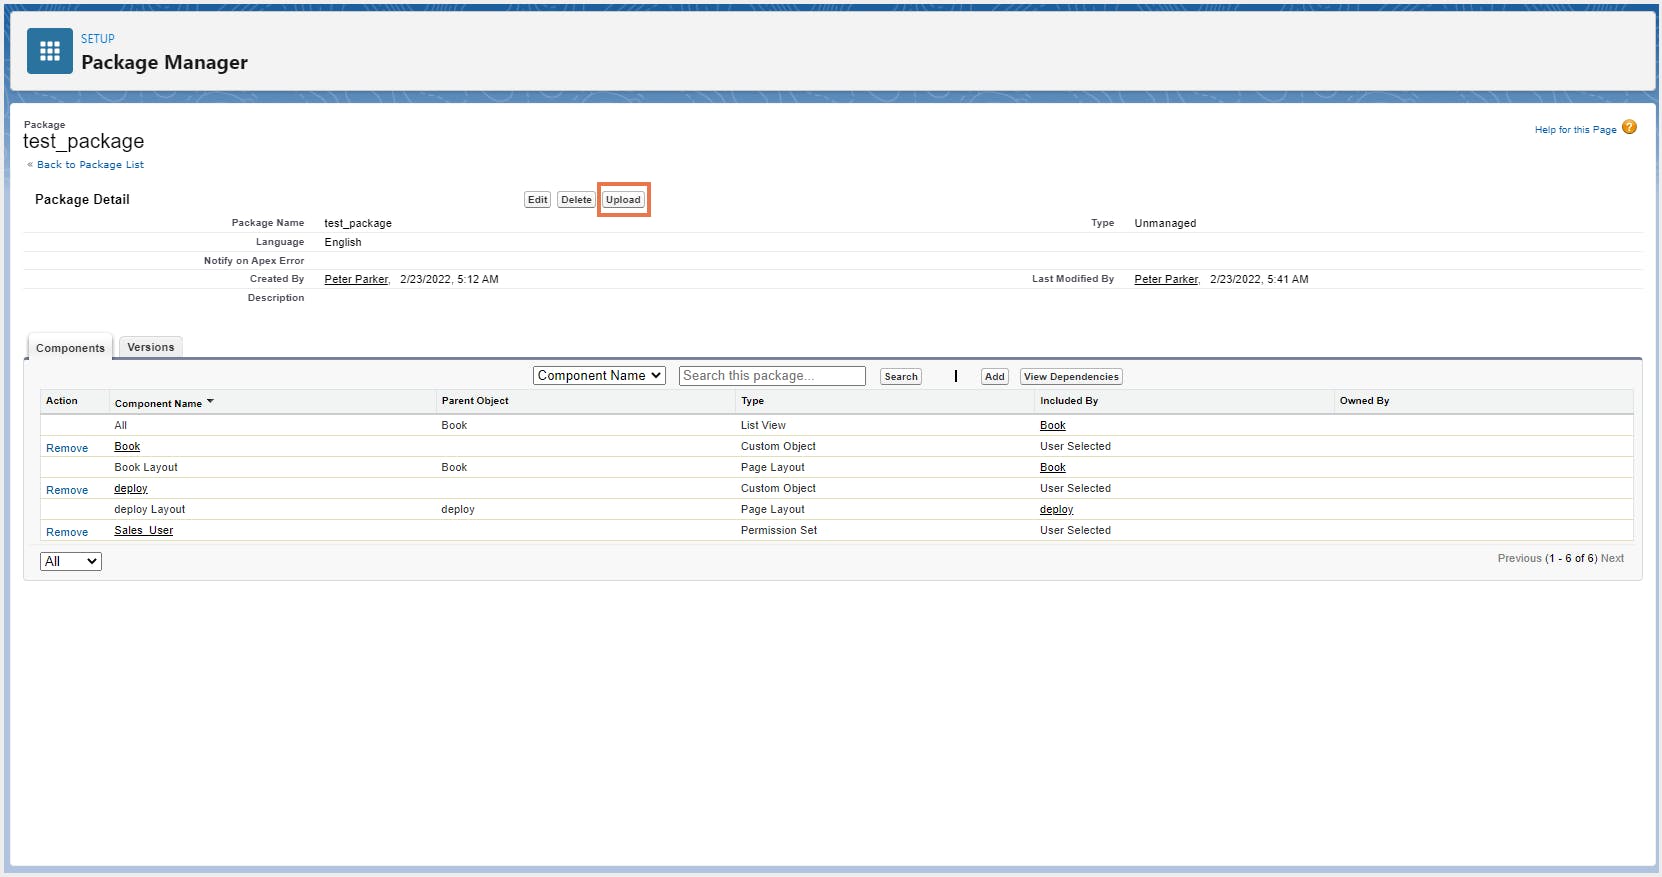
Step 6: Fill in the details and click Upload.
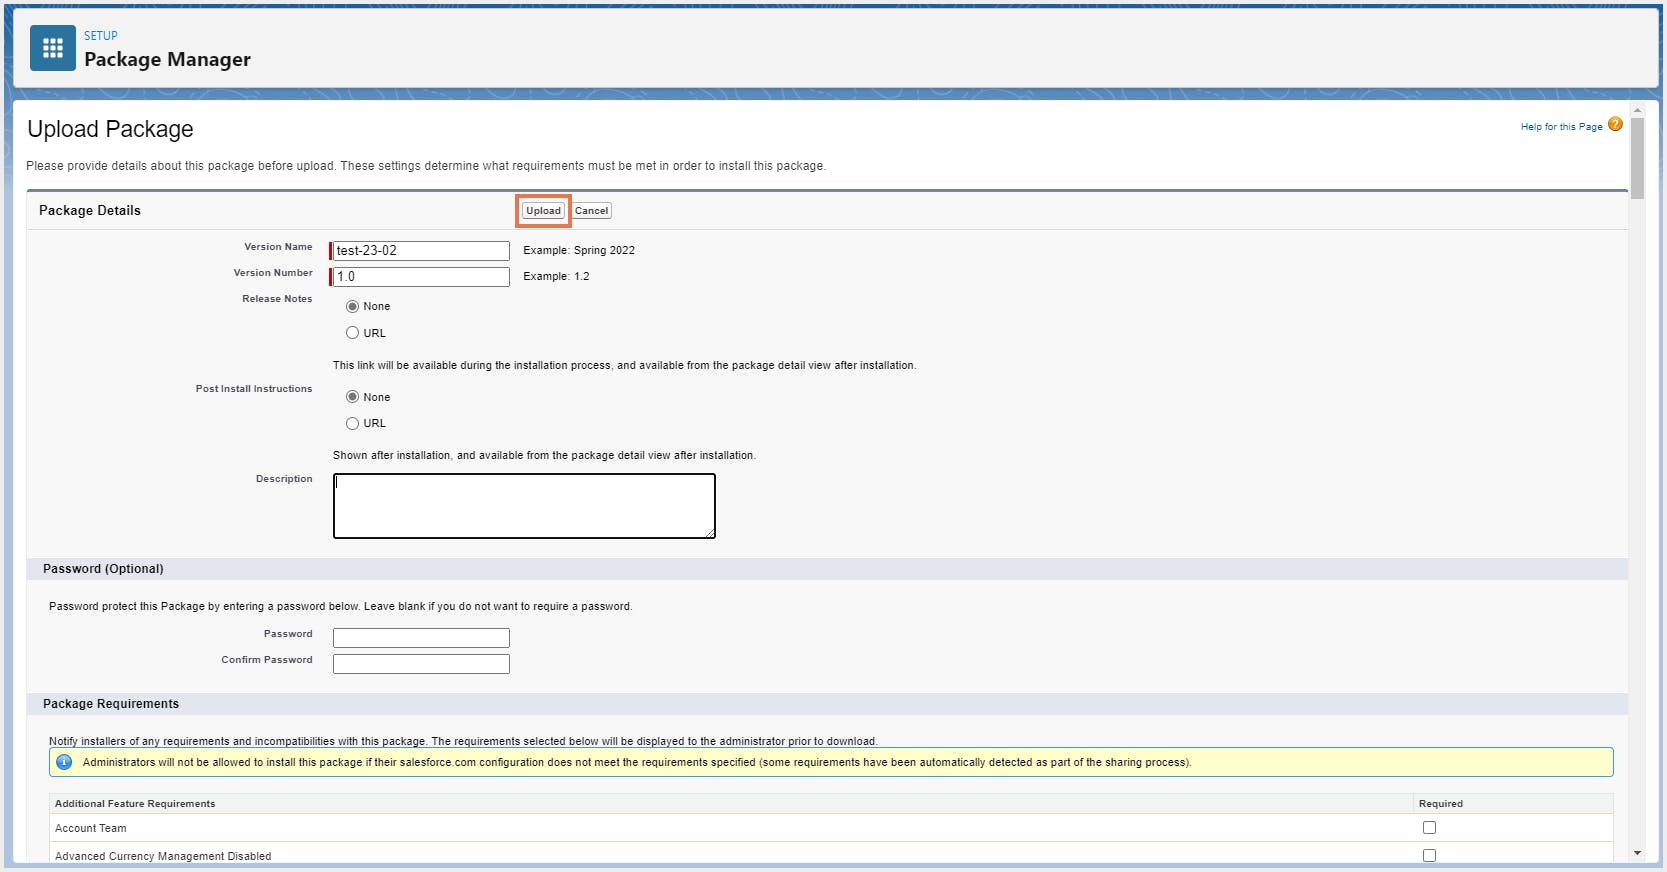
Once the upload is complete, you will receive the installation URL using which the package can be installed. You will receive an email when your package has been uploaded to the Package Manager page.
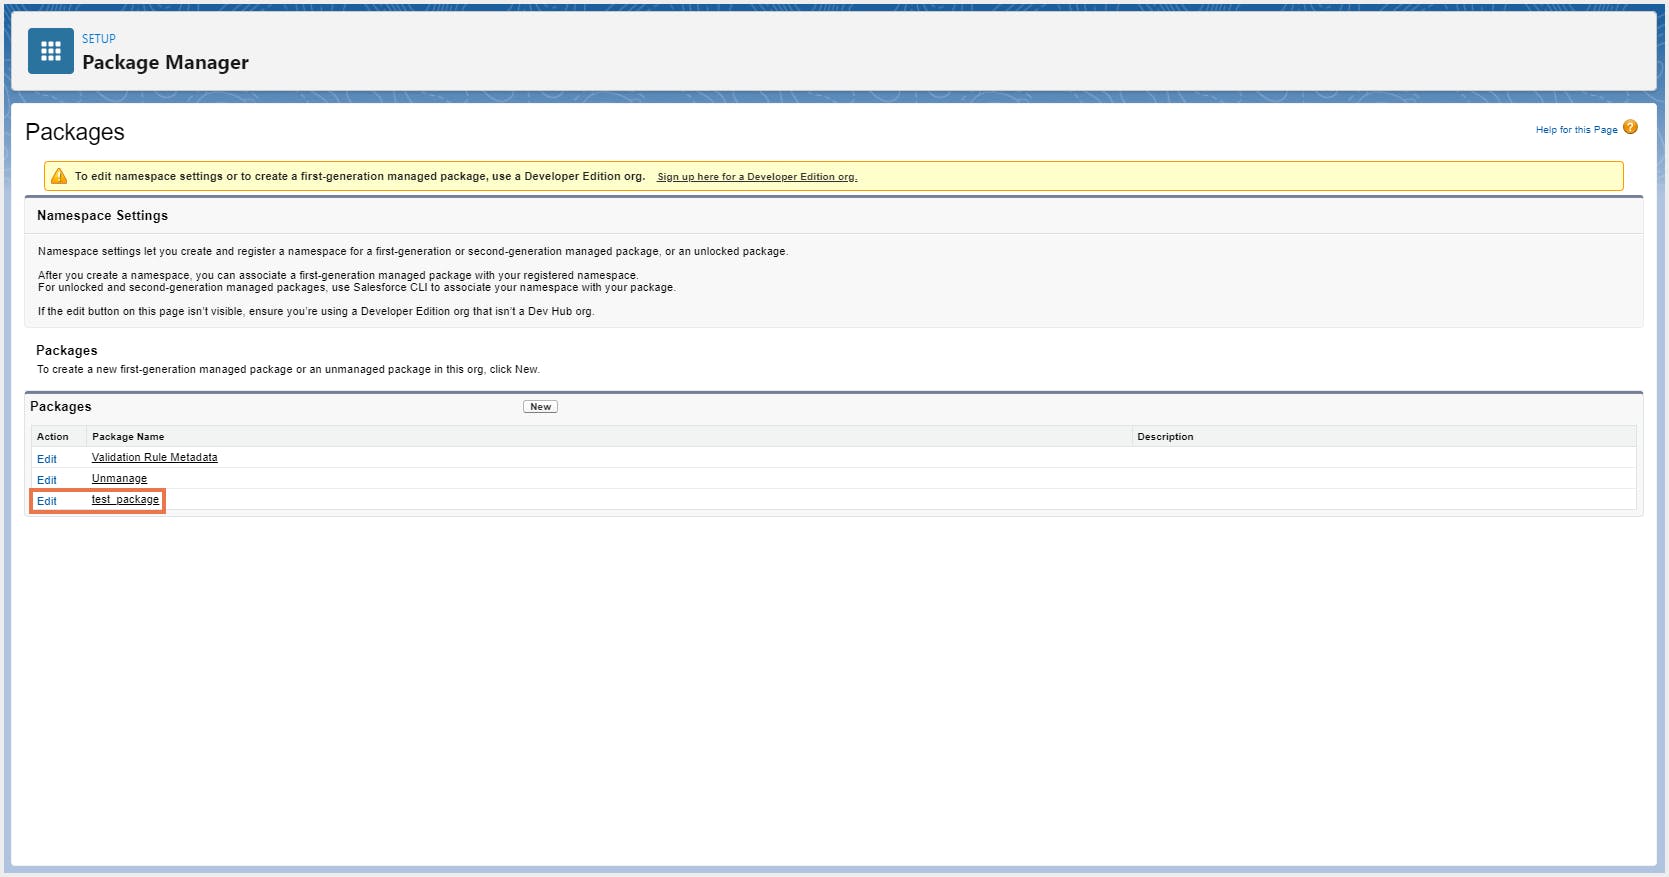
Note: Unmanaged packages do not support all metadata types. See Components Available in Unmanaged Packages
2.2. How to create a new version of your unmanaged package
Step 1: In Setup, enter Package Manager in the Quick Find box, and then select Package Manager.
Step 2: Select the unmanaged package you created before.
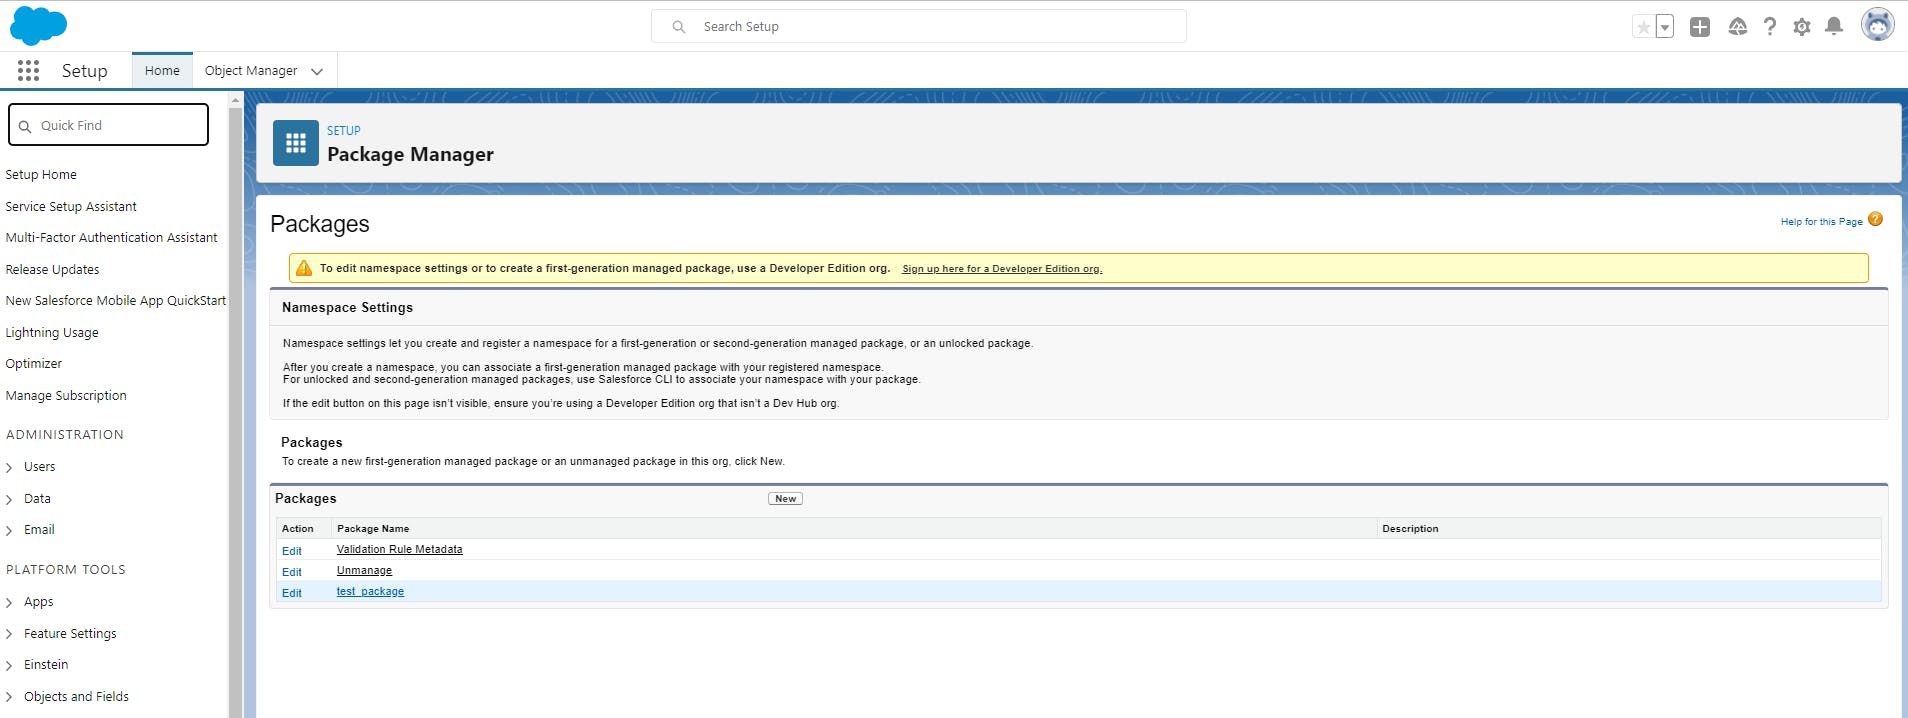
Step 3: In the Components tab, select Add.
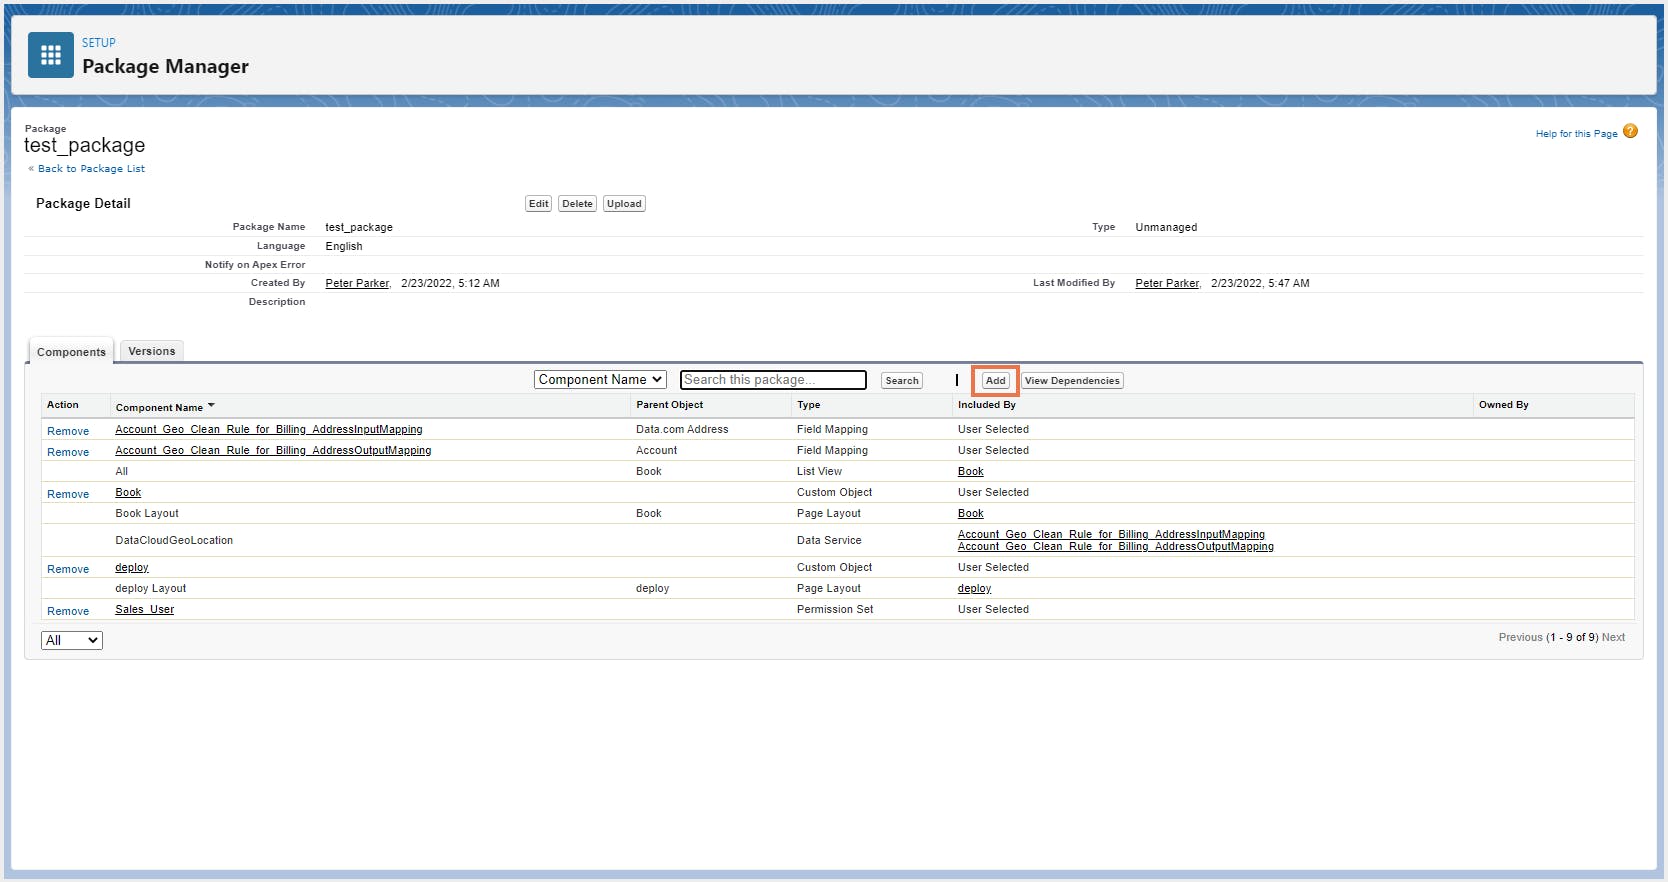
Step 4: In the Component Type dropdown list, select any new types of metadata you want to add to your backup, and click Add to Package for each metadata type.
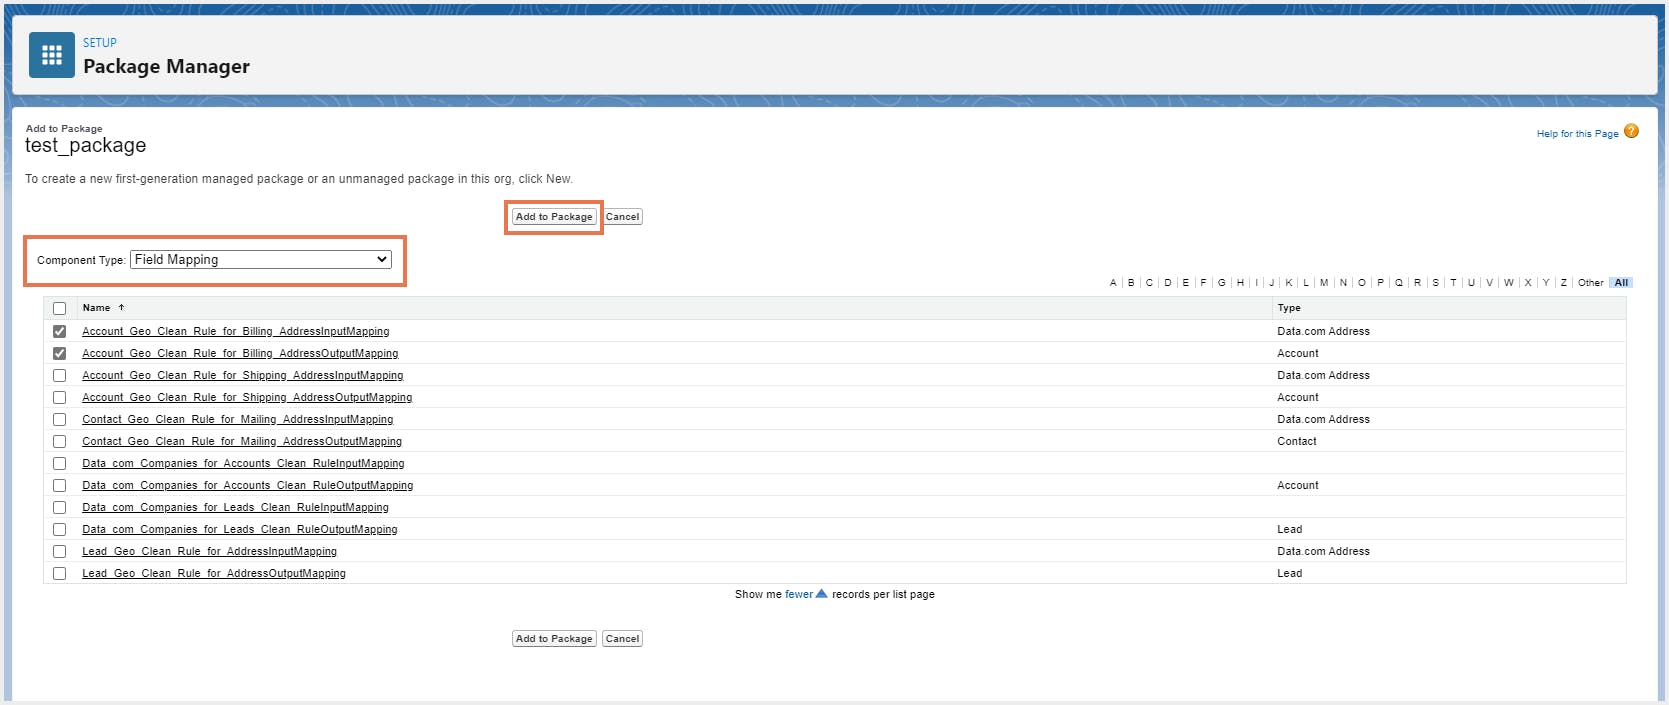
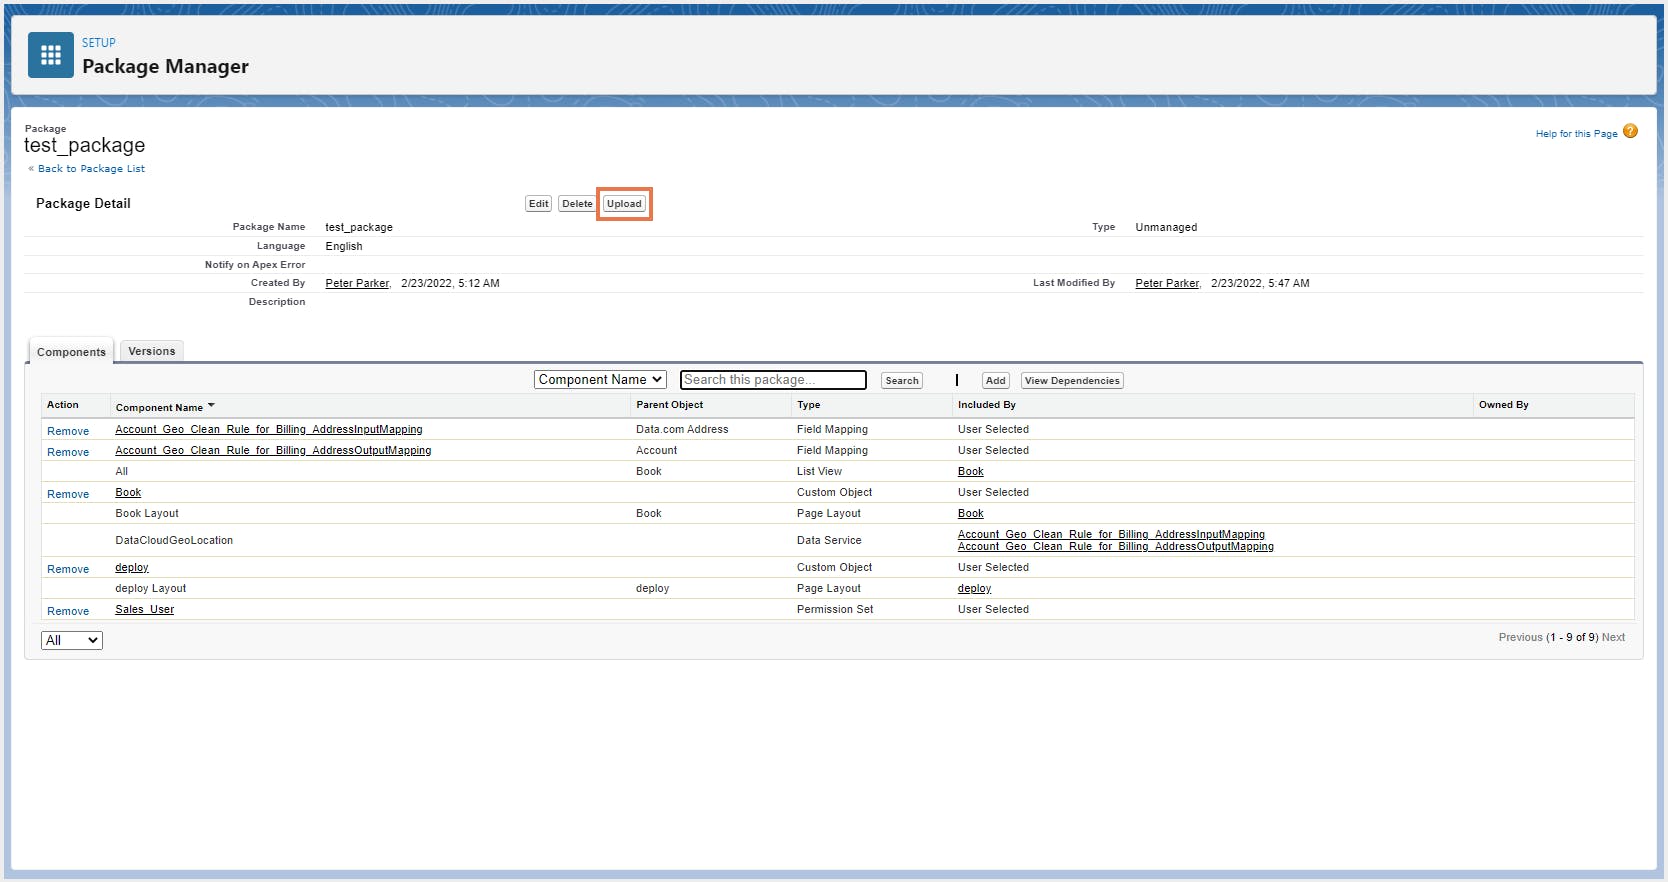
Step 5: Click Upload.
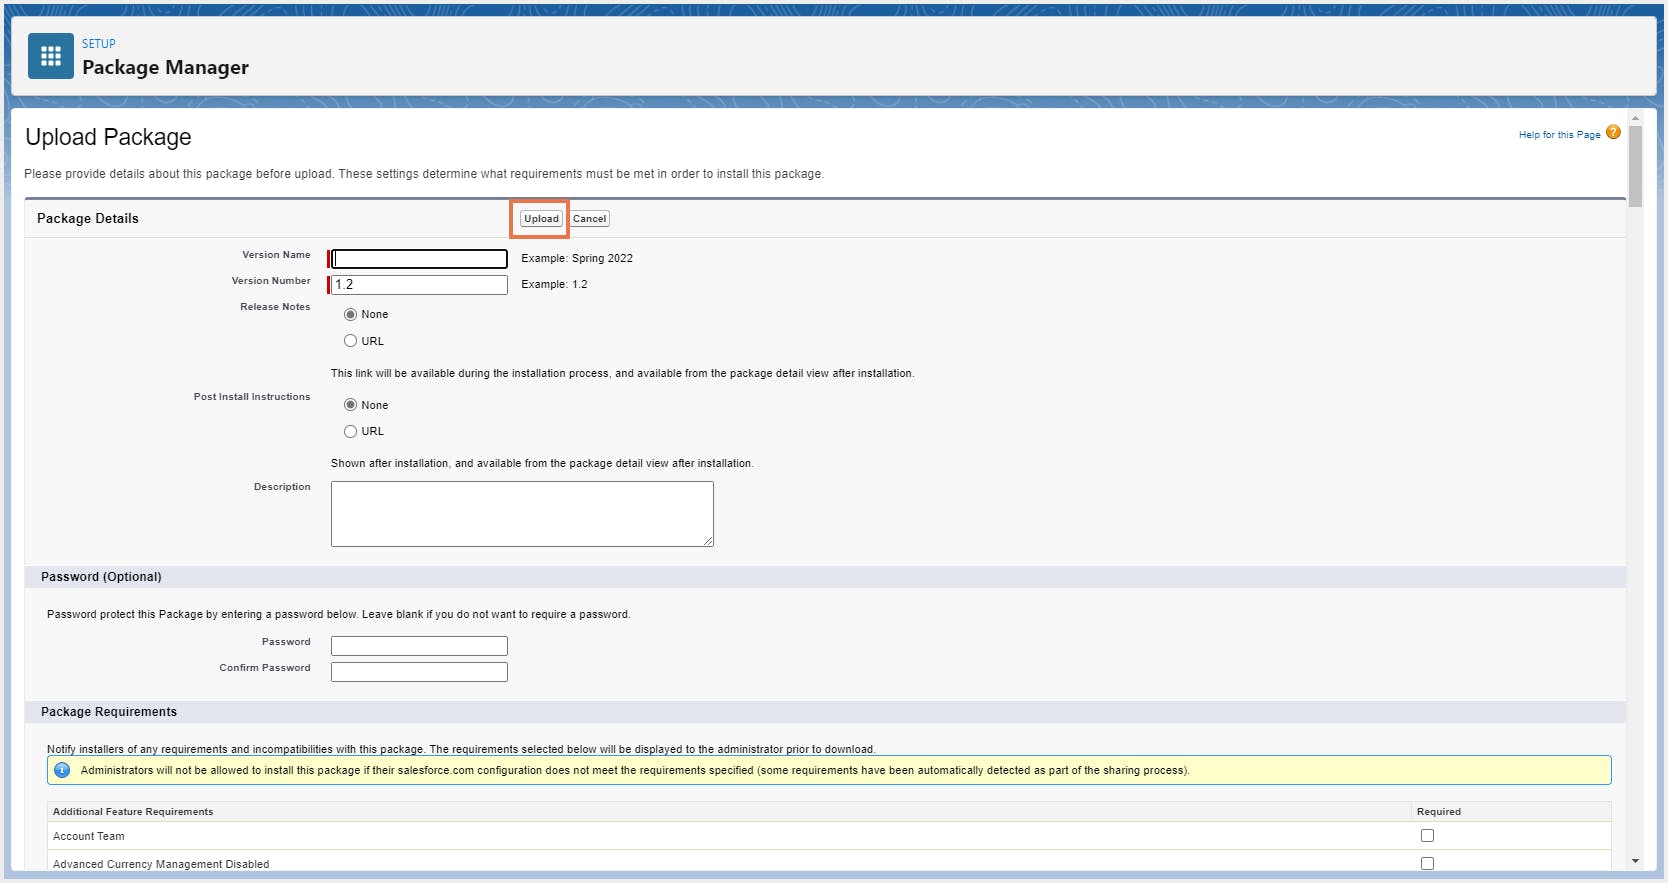
Step 6: In the Package Details page, fill in the required information, and once you are done, click Upload.
Note: Changes to components that were added in the previous package version are automatically captured when you create a new version.
2.3. Limitations of Salesforce metadata backup using Package Manager
- Backing up Salesforce metadata using Package Manager is a manual process, hence it is slow and cumbersome.
Unmanaged packages do not support all metadata types. (See Components Available in Unmanaged Packages)
- Since your metadata changes often, you will need to create a new version of the package regularly.
3. Salesforce metadata backup using change sets
Change sets can be used to copy your data from one Salesforce organization to another, for example, from a production org to a sandbox or developer org. To send metadata customizations from your current Salesforce org to another, create an outbound change set. Once you send the change set, the receiving org sees it as an inbound change set.
3.1. Required editions and user permissions:
Available in: Enterprise, Performance, Professional, Unlimited, and Database.com editions
User permissions needed:
Refer to the Salesforce documentation on change sets implementation tips before using it to back up your metadata.
3.2. Upload outbound change sets
Note:
- Sending an outbound change set to another org does not guarantee that the changes are implemented in that org. The change set must be deployed by the target org before the changes can take effect.
- A change set can have up to 10,000 files with a total file size of 400 MB. Change set components are represented as metadata XML files. Make sure that your change set does not exceed approximately 5,000 components.
For change sets to be sent from one organization to another, a deployment connection is required. Learn more about deployment connections
3.2.1. Select components for an outbound change set
Step 1: Go to Setup and enter Outbound Change Sets in the Quick Find box. Select Outbound Change Sets.

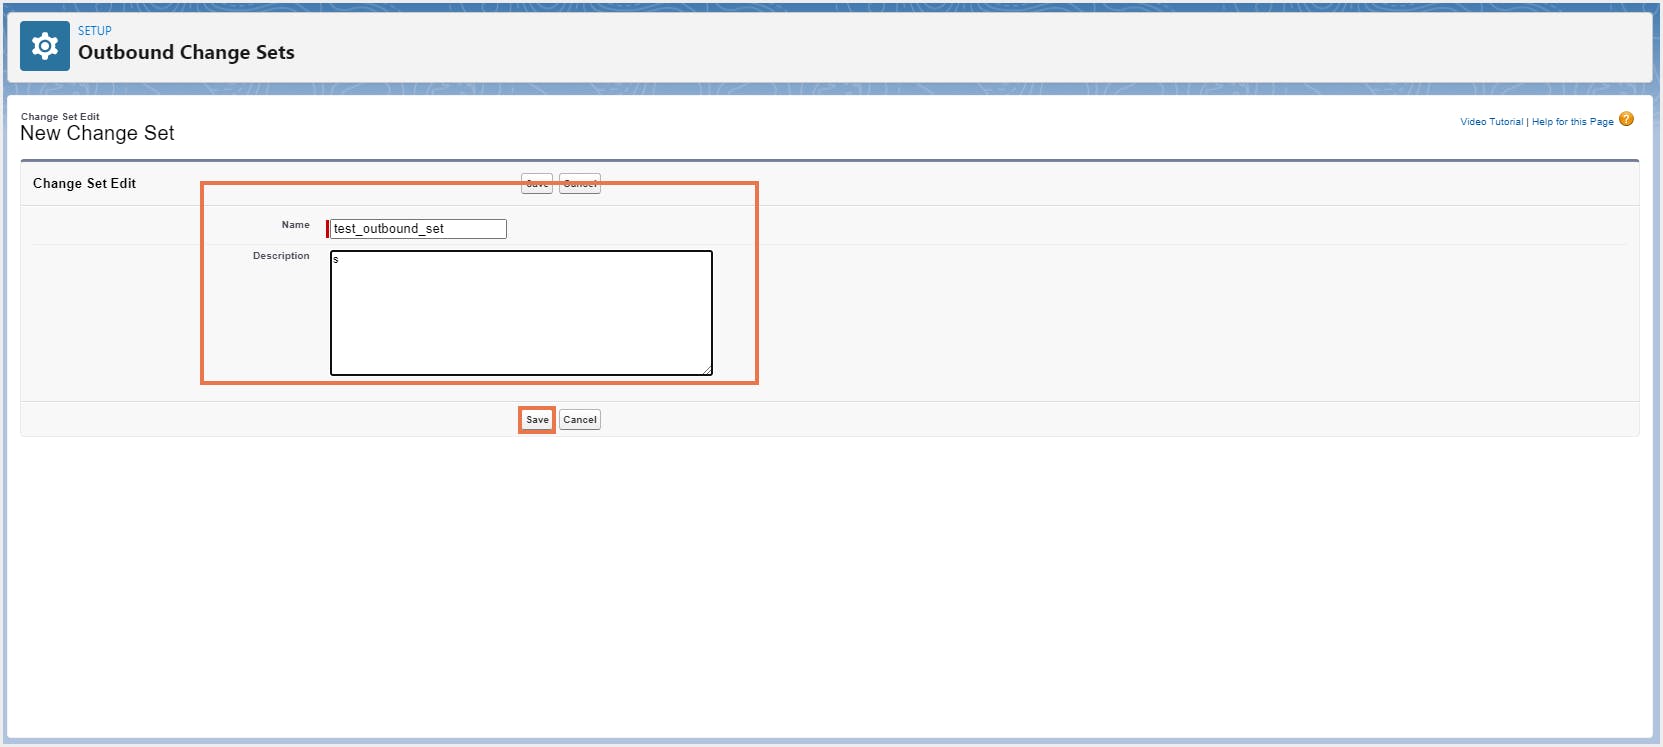
Step 2: Click New to create a new change set. Enter a name and description, and click Save.
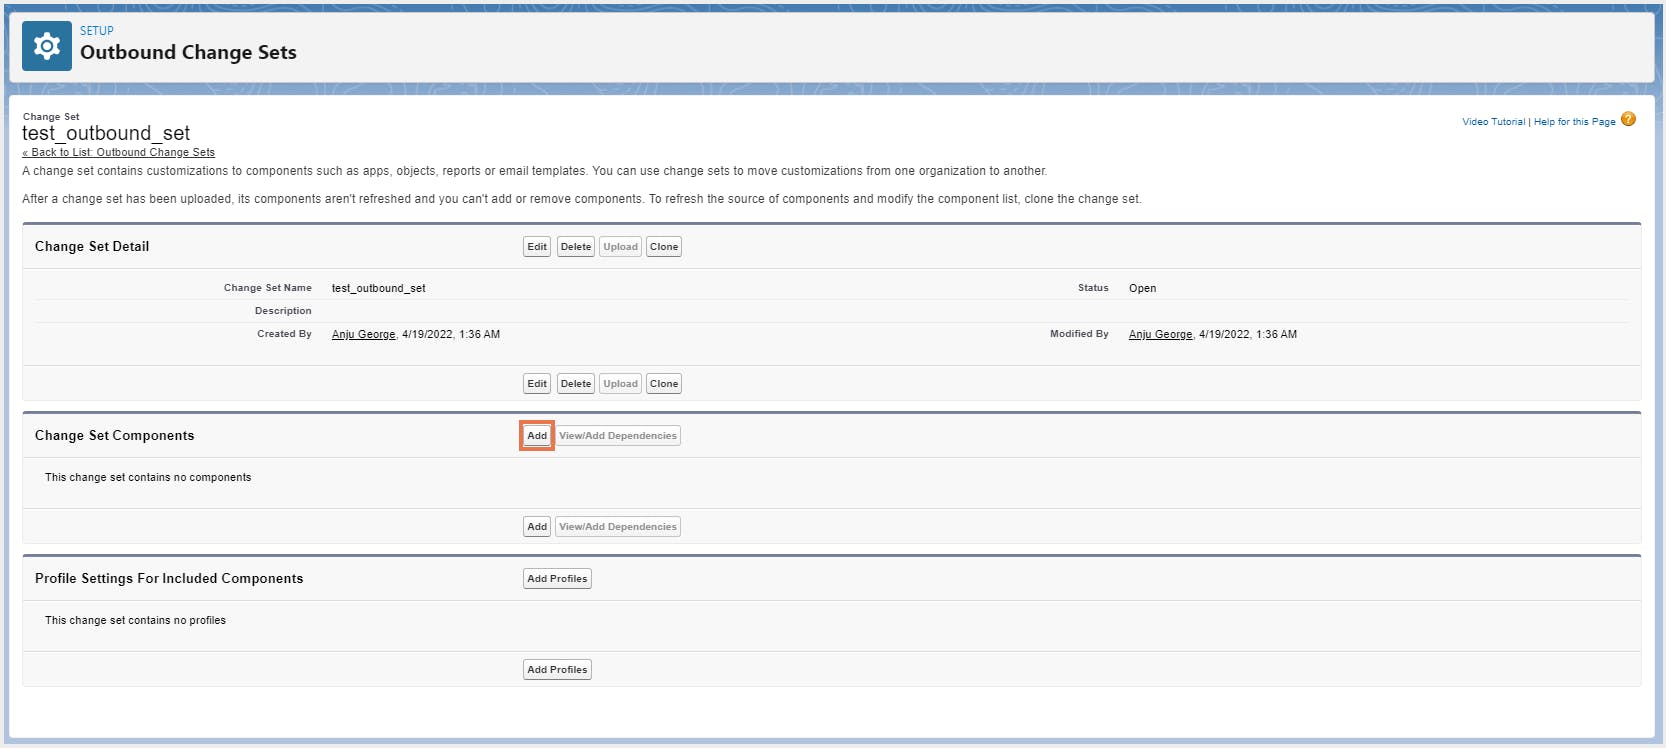
Step 3: Under Change Set Components, click Add to add components to the change set you are creating. Click here to see the list of components that are available in a change set.
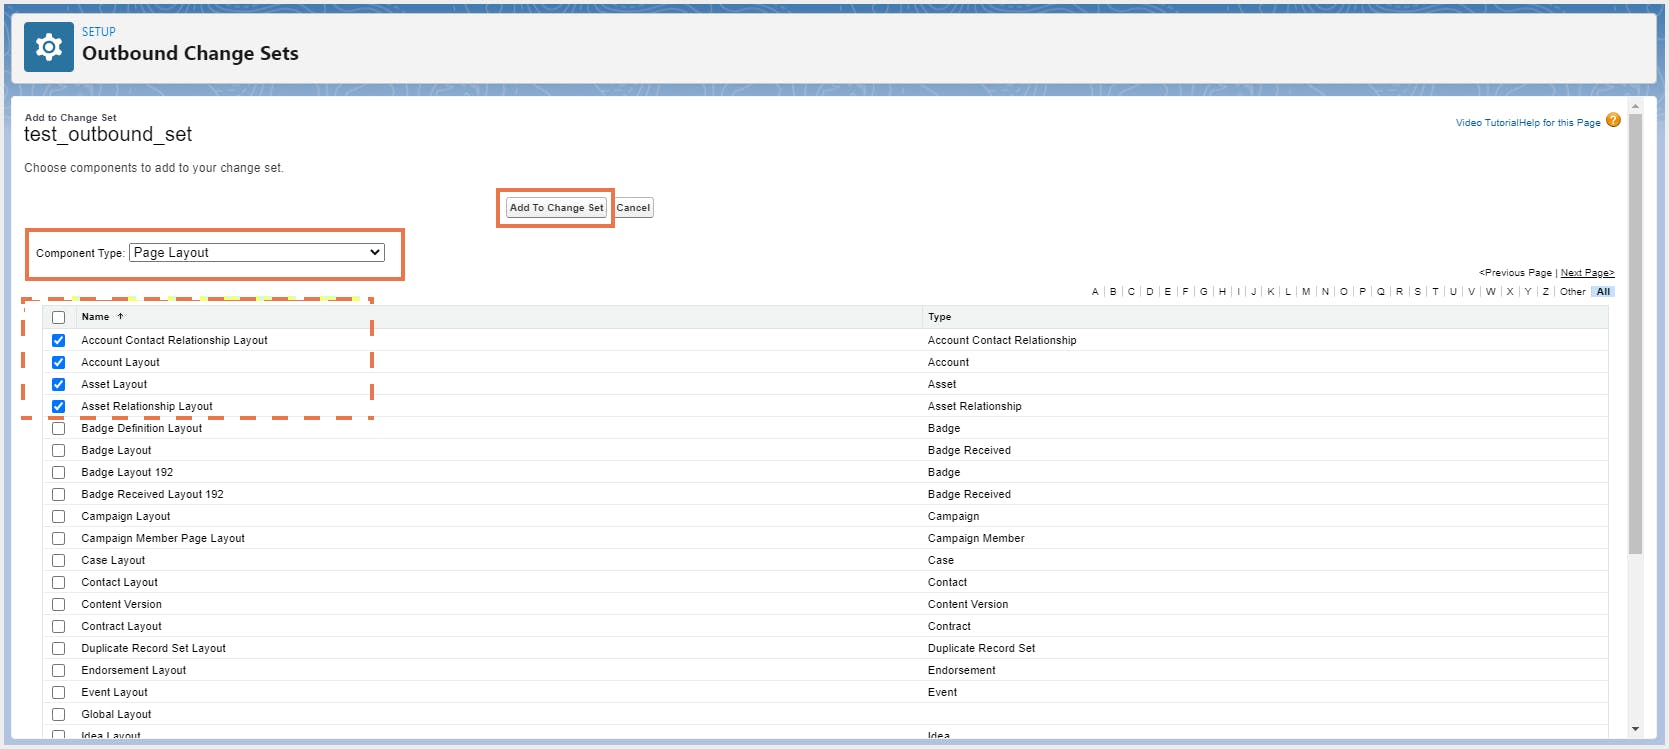
Step 4: Choose the type of component and the components you want to add, and then click Add to Change Set.
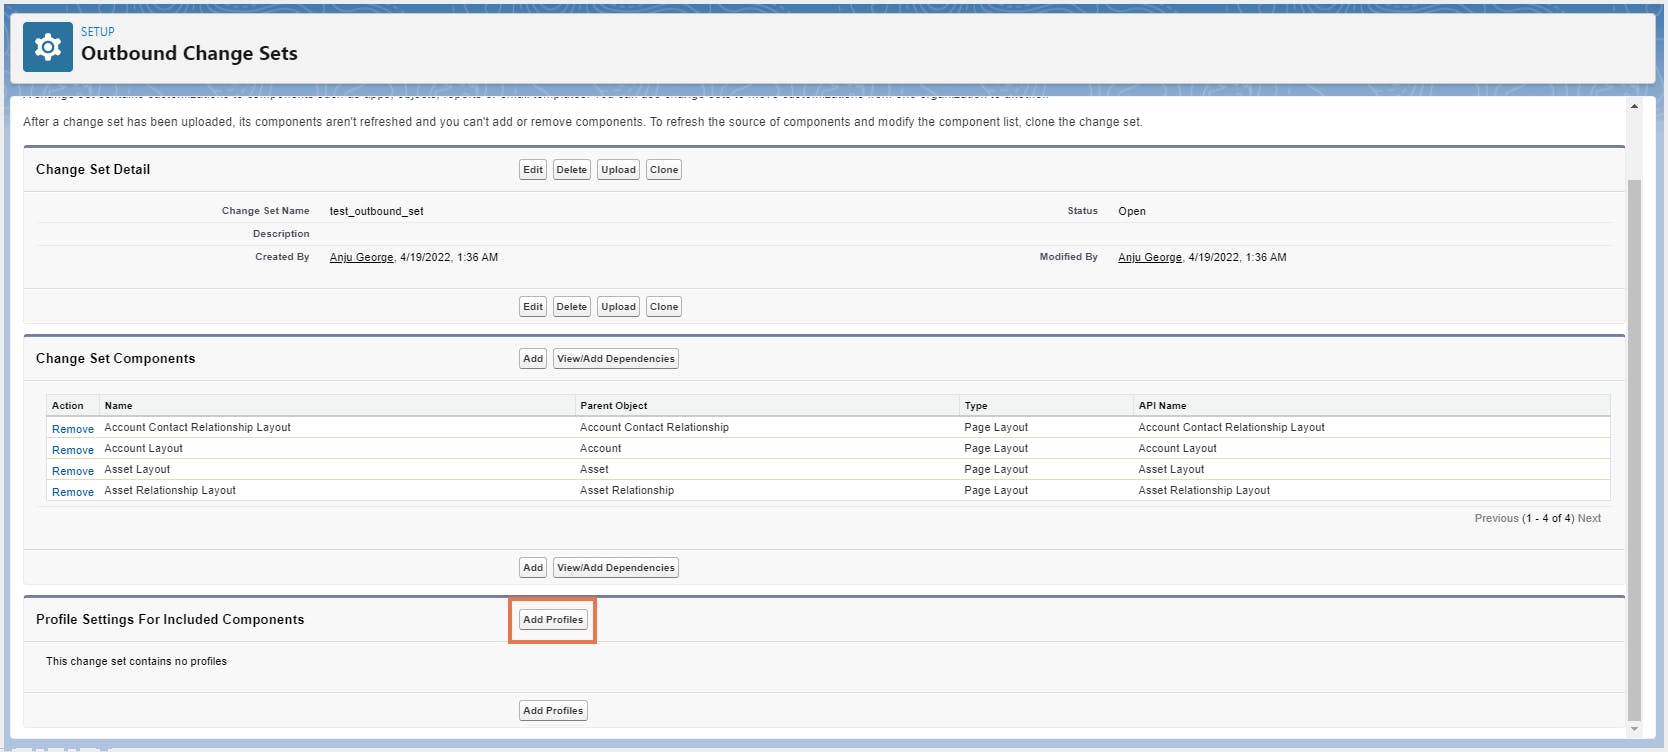
Step 5: Under Profile Settings For Included Components, click Add Profiles to add profile settings to the change set.
Step 6: Select the profile settings to add and click Add to Change Set.
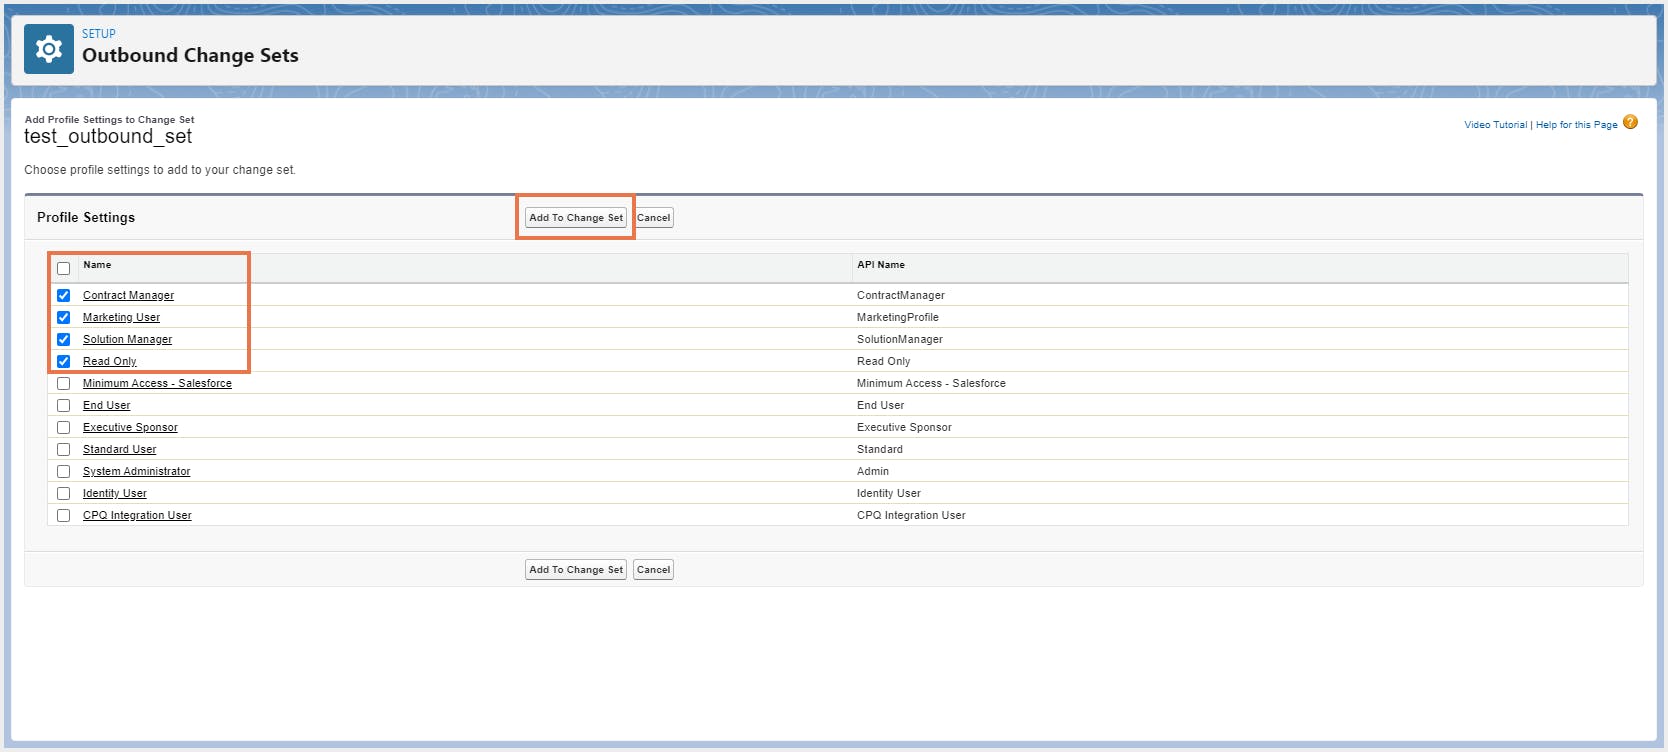
Step 7: Click View/Add Dependencies to add dependent components. (Optional)
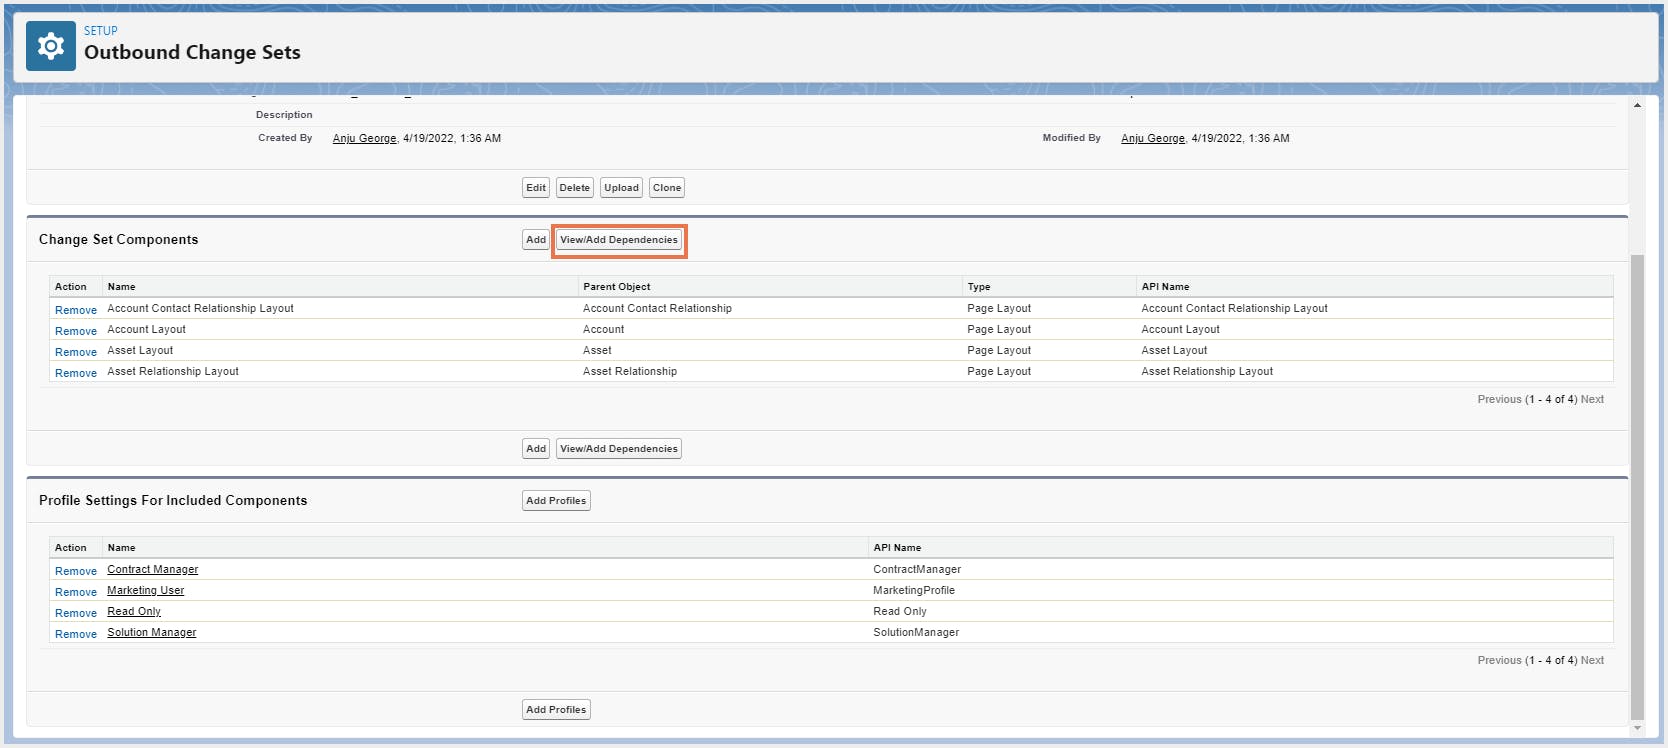
Note: A dependency is a relationship where one or more components must exist for another component to exist. Add dependent components to a change set, unless the dependent components exist in every org where this change set is deployed.
Step 8: Select dependencies to add and click Add to Change Set.
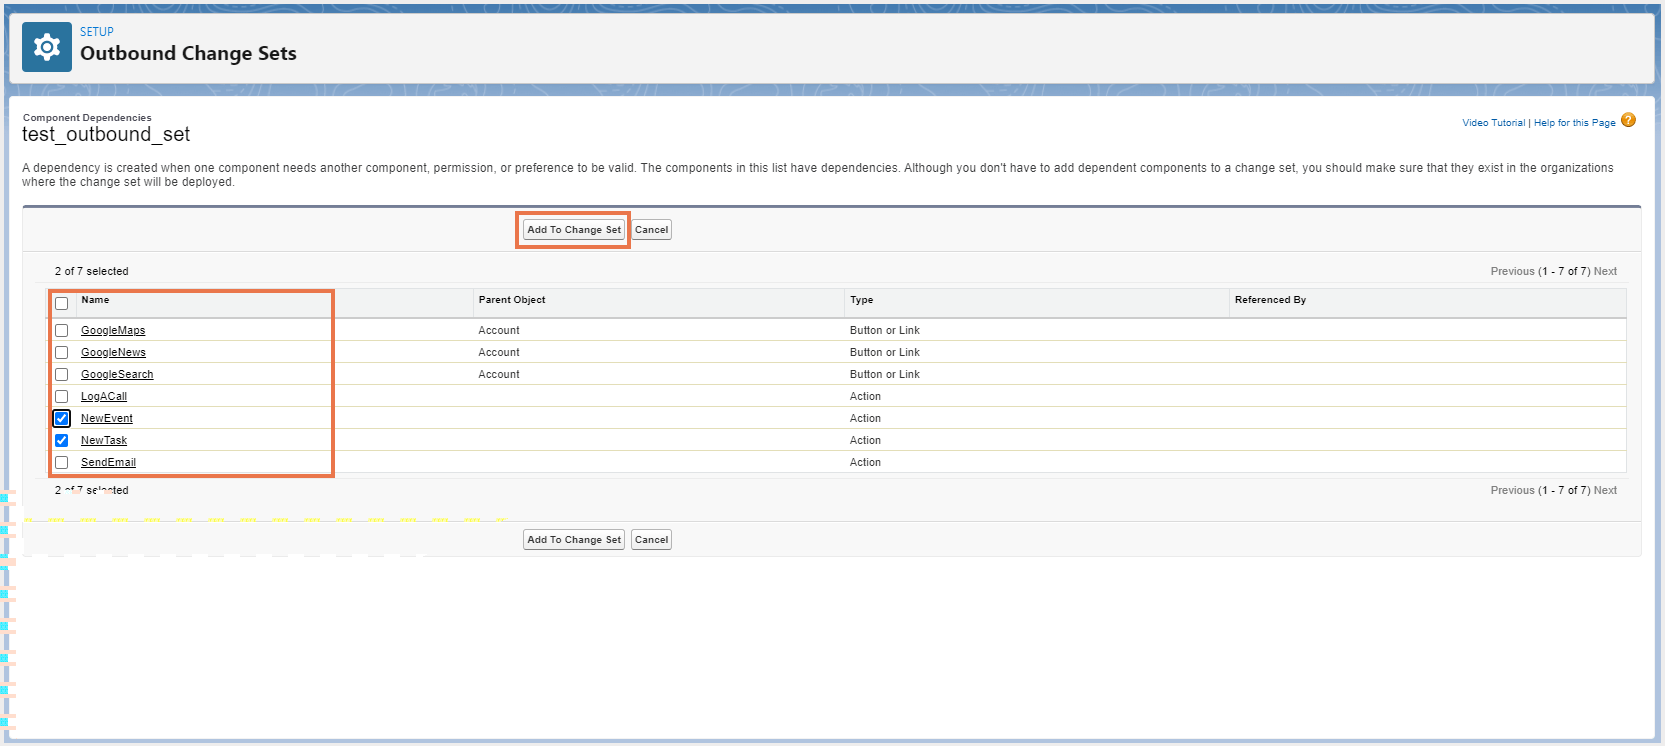
3.2.2. Upload an outbound change set
Step 9: Go to Outbound Change Sets from Setup and click Upload next to the change set you want to upload.
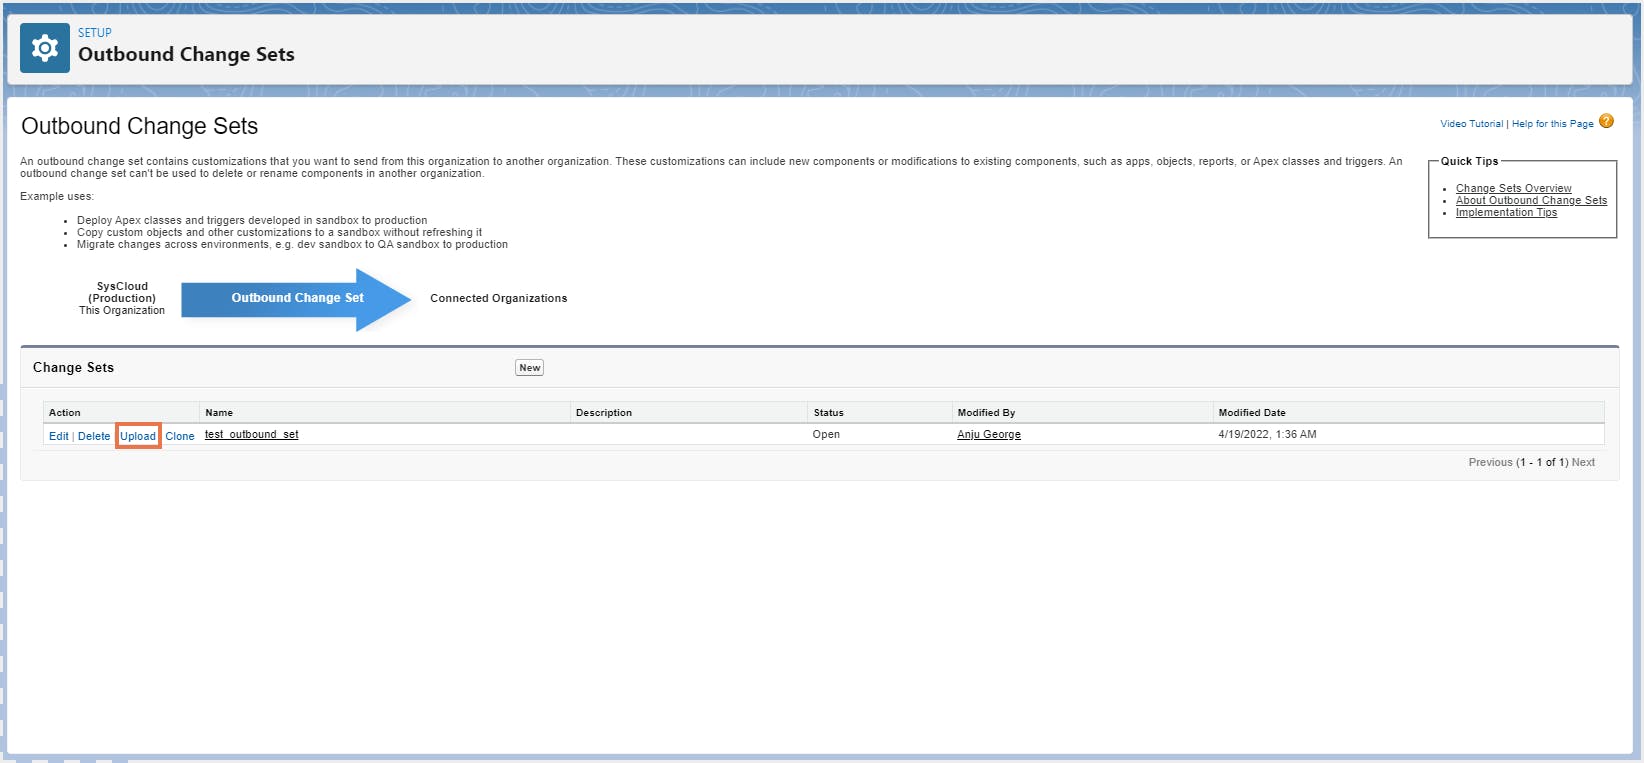
Step 10: Select the organization you want to send the change set to and click Upload. Once the upload is complete, the administrator responsible for authorizing deployments in the target organization will be notified.
Note:
- Outbound change sets expire six months after they are uploaded. Change sets are permanently deleted once they expire.
If you receive an error about cross-version validation, this means that the org used to create the outbound change set is running on a different version than the destination org. This error typically occurs during upgrades, because orgs may be upgraded at different times due to Salesforce staggered releases. If you receive this error, it means that you can only deploy those components that are compatible between both the versions. Learn more
3.3. Deploy Inbound Change Sets
Step 1: Go to Setup, enter Inbound Change Sets in the Quick Find box, and select Inbound Change Sets. The Inbound Change Sets page lists all the change sets awaiting deployment, as well as the history of deployed change sets.
Step 2: Click Deploy next to the change set you want to deploy. You can also review the change set before deploying it. To review, click the name of the change set to view its detail page.
Alternatively, you can perform a quick deployment to shorten the deployment time. Change sets that have been successfully validated can sometimes qualify for a quick deployment. Learn more
Note:
If the change set has been deleted from its source org, the Deploy link will not be available.
If a deployment of the change set is already in progress, the Deploy link will not be available until the deployment is complete.
- A change set is deployed in a single transaction. If the deployment is unable to complete due to some reason, the entire transaction is rolled back. Once a deployment is completed successfully, all the changes are committed to your org and the deployment cannot be rolled back.
The time taken to deploy a change set depends on its size and complexity. You can monitor the progress of the deployment during this time. Learn how to monitor deployments of change sets
- The change set expires
- The change set is deleted from the source org
- The source sandbox is deleted or refreshed after the change set is deployed
Note: A change set deployed from a source sandbox that was recently deleted or refreshed can temporarily appear available for deployment in the target organization. This is because a delay can occur between when the source sandbox is deleted or refreshed and when the target org shows the change set as unavailable. The length of the delay depends on how long it takes for internal cleanup processes to complete.
3.4. Limitations of Salesforce metadata backup using change sets
- Adding components is cumbersome, time-consuming, and confusing.
Change sets do not support all Salesforce components. (See Components Available in Change Sets)
- No roll-back functionality: Once you deploy a change set to a destination org, you cannot undo the changes if needed. This means that you will have to manually reverse all the changes in the source org, recreate the change set, and then deploy the changes in the target org.
- Component changes cannot be tracked down to a specific change set, and therefore, you cannot determine which change set an enhancement came from.
- Only connected orgs are supported.
- There is a high risk of deployment failure
4. Salesforce metadata backup using sandbox refresh
4.1. Required editions and user permissions:
Available in: Professional, Enterprise, Performance, Unlimited, and Database.com Editions
User permissions needed:
Click here to learn more about each type of sandbox
Click here to see sandbox licenses and storage limits
Although Salesforce clearly states in their documentation that sandboxes are intended to be used as testing environments, few Salesforce customers still use it as a backup alternative. Click here to view the steps to create a sandbox.
4.2. Limitations of Salesforce metadata backup using sandbox refresh
- A full sandbox can only be refreshed once every 29 days. Therefore, any changes made after the last refresh will not be backed up until the next refresh.
- Refresh requests need to be submitted manually.
- Once you refresh a sandbox, the previous version of the production org is gone. This means you will not have any backup snapshots.
- Time consuming: The larger the organization, the longer it will take Salesforce to create or refresh the sandbox. Once you submit a request to refresh the sandbox, it will be added to a queue. Depending on how long the queue is on any given day, it could take anywhere from a couple of days to a week to refresh the sandbox.
- To restore data to your production environment, you will have to perform manual export and import of data.
- Metadata cannot be restored. If the version of the metadata that you want to restore is still available in the sandbox, you can then manually recreate those settings in your production environment.
5. Salesforce metadata backup using Force.com/Ant Migration Tool
5.1. Prerequisites
Before you can use the ANT migration tool, you need to have Java and Ant installed and configured correctly on your local machine. Click here to see how to install Java and Ant.
Once you have Java and Ant installed, you can download the Ant Migration Tool from a Salesforce organization. Click here for the steps to install the Ant Migration Tool.
5.2. Using the Ant Migration Tool
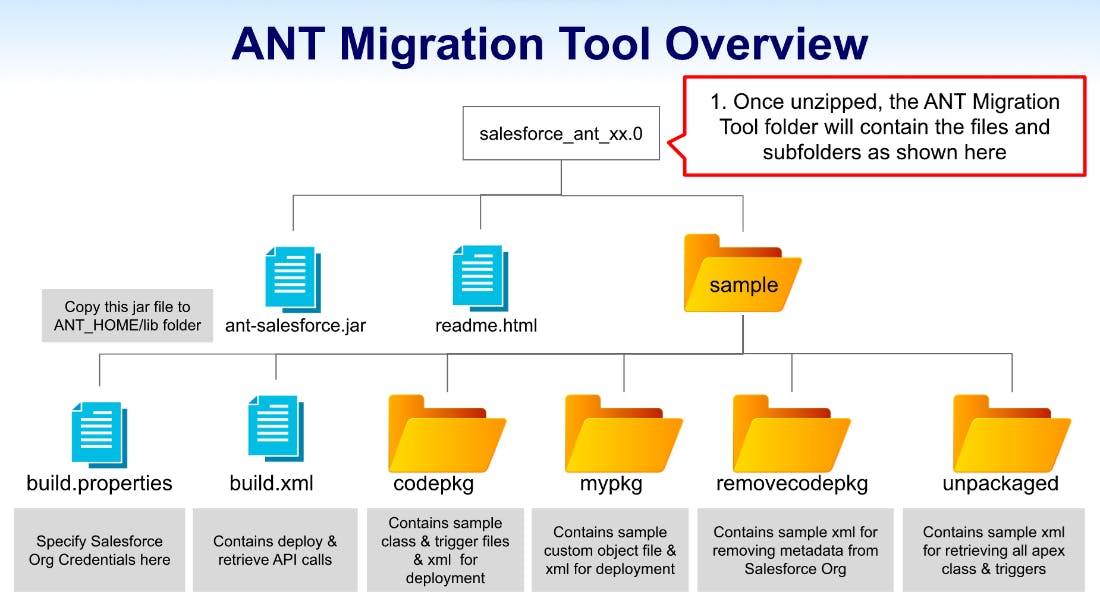
(Diagram sourced from: https://www.asagarwal.com/step-by-step-guide-on-getting-started-with-salesforce-ant-migration-tool/)
build.properties: This file is used to specify the credentials of the Salesforce organization from which metadata will be retrieved or to which metadata will be deployed.
build.xml: This file holds the task details that need to be performed in the Salesforce organization specified in the build.properties file, that is, retrieveCode, deployCode, undeployCode etc.
package.xml: This file is a project manifest that lists all the Salesforce components you want to retrieve or deploy in a single request.
1) Enter the credentials and connection information for the source Salesforce organization in build.properties. Click here to view steps
2) Create retrieve targets in build.xml. Click here to view steps
3) Construct a project manifest in package.xml. Click here to view steps
4) Run the Ant Migration Tool to retrieve metadata files from Salesforce. Click here to view steps
5) Enter credentials and connection information for the destination Salesforce organization in build.properties. Click here to view steps
6) Run the Ant Migration Tool to deploy metadata files or deletions to Salesforce. Click here to view steps
Refer to this Salesforce documentation for common migration issues that can occur when migrating metadata and deploying changes.
5.3. Limitations of Salesforce metadata backup using the Ant Migration Tool
- Since it lacks a graphical user interface (GUI), the Ant Migration tool has a steeper learning curve compared to other metadata backup options, making it difficult for non-developers to use the tool.
- Deployments using Ant requires manual editing of metadata, which is error-prone and time consuming.
- As the tool relies on the Salesforce metadata API, all metadata types cannot be deployed.
- Dependencies for the deployment package must be individually identified and incorporated.
- The complexity of the tool makes it inaccessible to most Salesforce users. Administrators and other Salesforce stakeholders who are not familiar with using the command line will not be able to deploy using the Ant tool.
- The Ant Migration Tool requires significant maintenance and setup.
6. Salesforce metadata backup using native Backup and Restore
In September 2021, Salesforce announced their plan to launch “Backup and Restore," their new backup and recovery product. With this service, customers will be able to automate daily backups of standard and custom objects, metadata, files, and attachments in Salesforce. They will also be able to restore backed-up data into orgs with just a few clicks.
6.1. Backup and Restore features
- Natively stores backup data on Salesforce in a physically separated data store
- Specify which records to restore using time-based and field-based criteria
- Automatically delete old backups after designated time intervals
- Control access to create, manage, and restore backups
- Perform high-level audits on who is initiating, modifying, or running backups
- Satisfy industry standard requirements for disaster recovery while maintaining CCPA and GDPR compliance
6.2. Why choose third-party cloud backup tools over Salesforce Backup and Restore?
Having a backup solution built within the platform is risky
- There are significant drawbacks to using a backup solution built within the platform you are backing up. Even though Salesforce segregates the storage of backup data from production data, your point of data access is still the same - the Salesforce platform.
- Using a native backup solution means you will not be able to access your backups in the event of a Salesforce outage.
- Having the backup copy on the same platform also means a malicious user with access to the data in your Salesforce org can easily access your backup data as well.
- Backup centers are also regionally co located, so an outage in that region will disable both the backup and production data.
- There is no option to download or export the backup data and move it out of the Salesforce environment.
Backups are only taken daily. Most enterprises want backups of their business-critical data to be no older than 15 minutes, according to Christopher Bertrand, Senior Analyst at Enterprise Strategy Group.
A third-party cloud backup tool like SysCloud has the ability to take regular backups more frequently, up to three times a day and access multiple snapshots.
It is easier to integrate Salesforce backup into an existing backup architecture. If an organization is already using a third-party cloud backup solution, then it makes sense to use that vendor’s backup software for Salesforce as well, rather than using the native Salesforce backup tool. This way, administrators can manage backups for all the clouds from a single console.
Having a single pane of glass to manage all SaaS (Software as a Service) applications will save a lot of effort and time, which in turn can be used to focus on the core business. SysCloud backup solution provides a unified platform from which administrators can manage all critical SaaS applications.
Backing up your data is a third-party cloud backup vendor’s primary business, which means they will work diligently to make sure your backups and restores are working perfectly. On the other hand, Salesforce is not a backup company, and while the backup tool integrated into the Salesforce platform will likely work as advertised, users prefer to use a dedicated backup solution since it offers greater capabilities.
7. Salesforce metadata backup using SysCloud
As discussed above, the native Salesforce metadata backup options do not serve as a complete backup and restore solution for your Salesforce metadata. Even Salesforce recommends using third-party cloud backup solutions to proactively back up your Salesforce data and metadata.
With third-party cloud backup solutions like SysCloud, administrators can effortlessly back up all standard and custom objects, metadata, Apex triggers, and chatter, easily restore data from any point-in-time backup snapshot, and maintain object relationships. Admins also have the option to export all Salesforce objects as .csv or .xlsx files. SysCloud can also identify ransomware files, phishing scams, and compliance issues in the Salesforce data being backed up.
Click here to learn more about SysCloud backup for Salesforce.
Recommended content
9 Nov 2022
10 min read
16 May 2022
7 min read
16 May 2022
15 min read
16 May 2022
5 min read
Get actionable SaaS administration insights
We don’t spam. Unsubscribe anytime.
In this article
- Why backup Salesforce metadata?
- Package Manager
- Change sets
- Sandbox refresh
- Force.com/Ant Migration Tool
- Native Backup and Restore
- Salesforce metadata backup using SysCloud

