Categories
In this article
- Default data retention in OneDrive for business
- Limitations of default retention methods
- Native retention methods
- Retention policies to retain OneDrive for business data
- eDiscovery to retain OneDrive for business data
- Microsoft 365 native backup tool
- Limitations of native retention methods
- Retention with third-party backup solutions
A Guide to OneDrive for Business Data Retention
15 Apr 2025
6 min read
OneDrive data retention at a glance
- Files deleted from OneDrive can be permanently lost if they are not restored within the default retention period.
- Microsoft 365’s retention rules can be complicated and may not apply uniformly, creating potential risks for data loss.
Read more
1. Default data retention in OneDrive for business
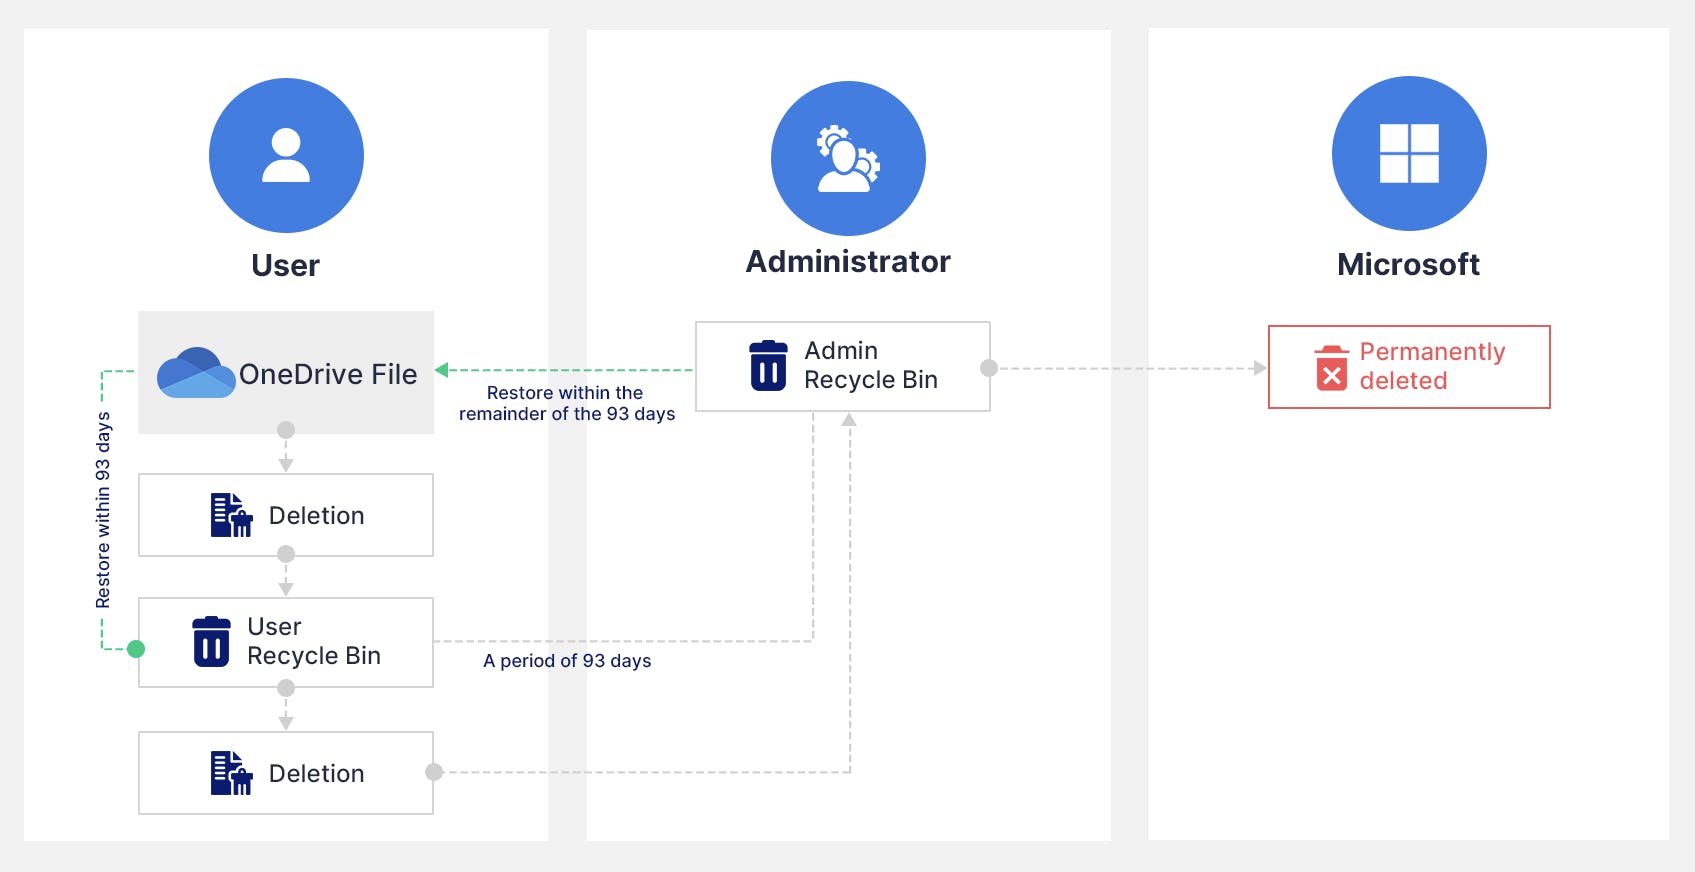
When a file is deleted in OneDrive for Business, it is initially moved to the first-stage Recycle Bin, where end users can recover it. If the file is deleted from the first-stage Recycle Bin, it is transferred to the second-stage Recycle Bin, which is accessible only by the site collection administrator. Files remain recoverable across both stages for a total of 93 days from the initial deletion date. After the 93-day retention period ends, the files are permanently deleted and cannot be restored through native Microsoft 365 recovery options.
To learn more about how to recover deleted data from OneDrive, click here.
2. Limitations of Microsoft 365 default retention for OneDrive for business files
- First, all data retained, whether active or in the Recycle Bin continues to consume storage quota allocated to the organization’s Microsoft 365 subscription. If the storage limit is reached, organizations must purchase additional storage to avoid service disruptions.
- Additionally, once the 93-day retention window expires, deleted files are purged permanently from the system and cannot be recovered through Microsoft’s native tools. This poses a significant risk in cases of accidental or malicious deletions that go unnoticed beyond the default retention period.
3. How to retain OneDrive for business data?

OneDrive is a personal file storage location and SharePoint is a collaborative storage platform. However, both these services share similar designs and core functionalities. Hence, the retention methods listed here also apply to SharePoint sites. To learn more about SharePoint retention, click here.
4. Native retention methods
Organizations with supported Microsoft 365 licenses can use tools like Retention Policies, Retention Labels, and eDiscovery (Standard and Premium) to enforce data governance strategies. Additionally, Microsoft has introduced Microsoft 365 Backup as a solution to recover and restore OneDrive data.
4.1. Retention policies and retention labels to retain OneDrive for business data
- Automatically delete files after a specified duration.
- Apply policies to selected users, groups, or OneDrive sites.
- Use adaptive scopes to dynamically target users based on attributes like department or location.
- Assign specific retention settings to files and folders within OneDrive.
- Automatically apply labels using predefined rules or sensitive information types.
- Use default labels for OneDrive document libraries.
- Define whether content is retained, deleted, or reviewed when a retention period expires.
- Make content record-based, preventing edits or deletion during the retention period.
These policies and labels operate silently in the background and are managed via the Microsoft Purview compliance portal. To learn more about retention policies and labels, click here.
4.1.1. Licensing requirements to use retention policy
4.1.2. How to set retention rules to retain OneDrive for business files?
Note: To create and configure retention policies, users would need Global admin or compliance admin credentials.
Step 1: Sign in to the Microsoft Purview portal -> Solutions -> Data Lifecycle Management.

Step 2: Select Policies -> Retention policies.

Step 3: Select ‘Retention policy’ -> ‘+New retention policy’.

Step 4: Add a name to your retention policy and select the type of retention policy you need.
Step 5: Choose ‘OneDrive account’ as the location. Administrators can choose specific accounts to include or exclude.

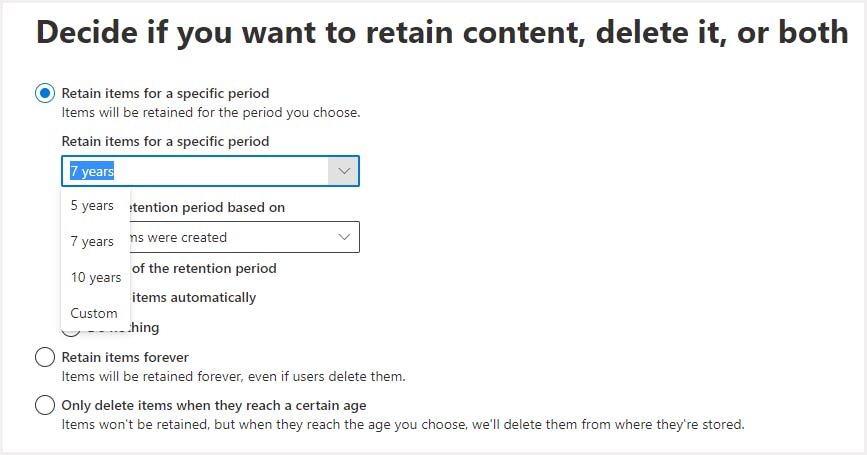
Step 6: Choose the retention duration. Administrators can choose to retain the data in the chose OneDrive account for a custom period or forever.
Step 7: Review and finish. Check the settings and click “Submit”.
4.1.3. What happens when OneDrive for business data gets deleted after retention policy is applied?
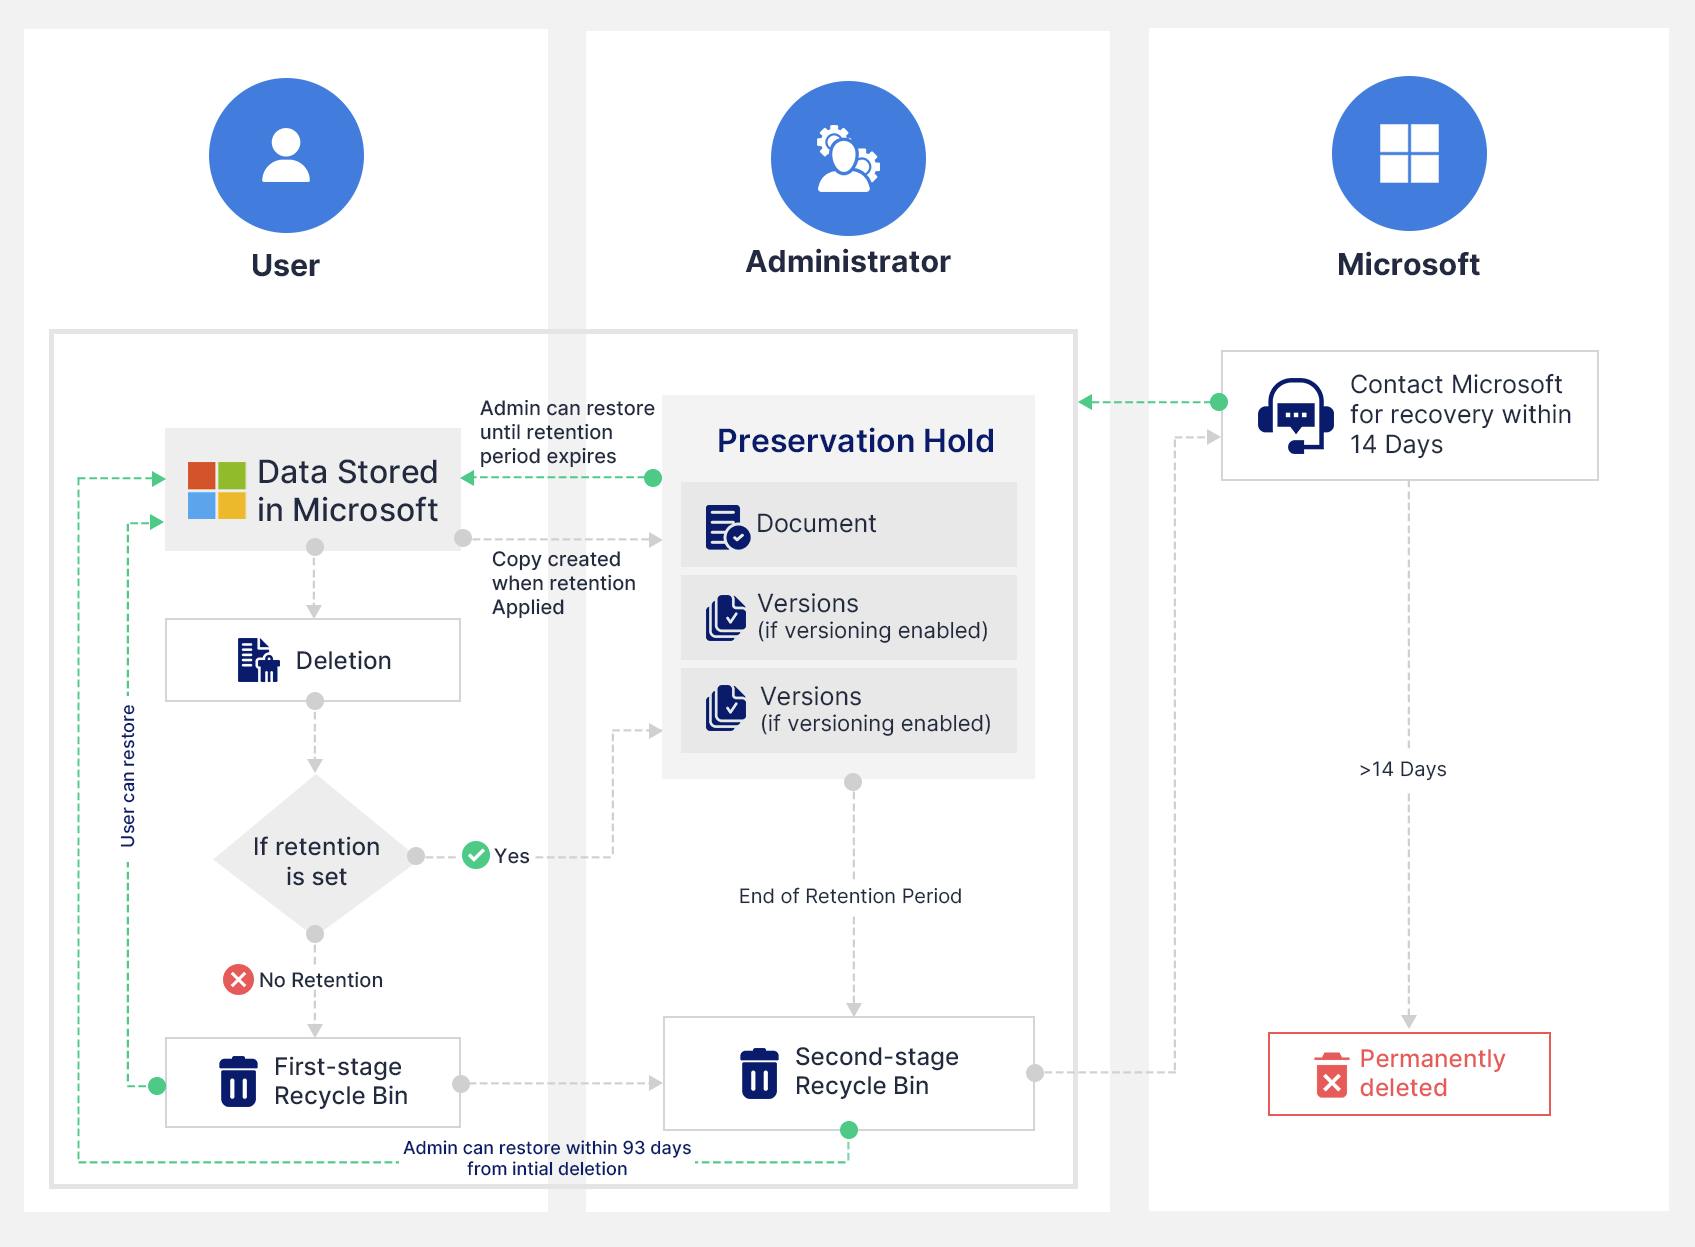
User deletes a file: When a user deletes a file in OneDrive, it is first moved to the first-stage Recycle Bin, where it remains for up to 93 days. If the user deletes the file from the Recycle Bin during this period, it is moved to the second-stage Recycle Bin, accessible only by the administrator.
Retention policy triggers Preservation Hold: If a retention policy is in place, Microsoft 365 creates a hidden copy of the file and stores it in the Preservation Hold Library. This applies even if the user has deleted the file from both Recycle Bins. The preserved copy is not visible to the user but is retained securely until the end of the retention period.
File remains accessible to admins: While the file is no longer visible to the user, administrators can search, recover, or export the preserved data using Microsoft Purview Content Search, eDiscovery, or Graph API integrations. This ensures compliance even when end users delete content maliciously or unintentionally.
End of retention period: Once the retention period expires (e.g., 3 years, 7 years, etc.), Microsoft 365 automatically and permanently deletes the content. The file is purged from all back-end storage, including the Preservation Hold Library, and cannot be recovered using native tools.
If no retention policy is applied, the standard 93-day Recycle Bin timeline applies, after which the file is automatically and permanently deleted.Post-deletion recovery (Microsoft intervention): If an admin needs to recover a file that was mistakenly deleted and is no longer available, they can contact Microsoft within 14 days of permanent deletion. Beyond this 14-day window, data recovery is no longer possible through Microsoft support.
4.2. Microsoft eDiscovery to retain OneDrive for business data
To learn more about eDiscovery, click here.
4.2.1. License requirements to access eDiscovery to preserve OneDrive for business data
4.2.2. How to enable eDiscovery holds to retain OneDrive for business files?
Step 1: Go to Microsoft Purview portal. In the left navigation pane, select Show all, and then select eDiscovery > Premium or eDiscovery > Standard.

Note: Users need to login with Global administrator or compliance administrator credential to access the Microsoft Compliance center.
Step 2: On eDiscovery (Standard) page, create a case that you want to create the hold in by clicking ‘+Create a case’ or open an existing case.

Step 3: Click the case name and navigate to ‘Holds’ on the top menu bar. Click ‘+Create’.

Step 4: Add a name for the hold and a description if needed.
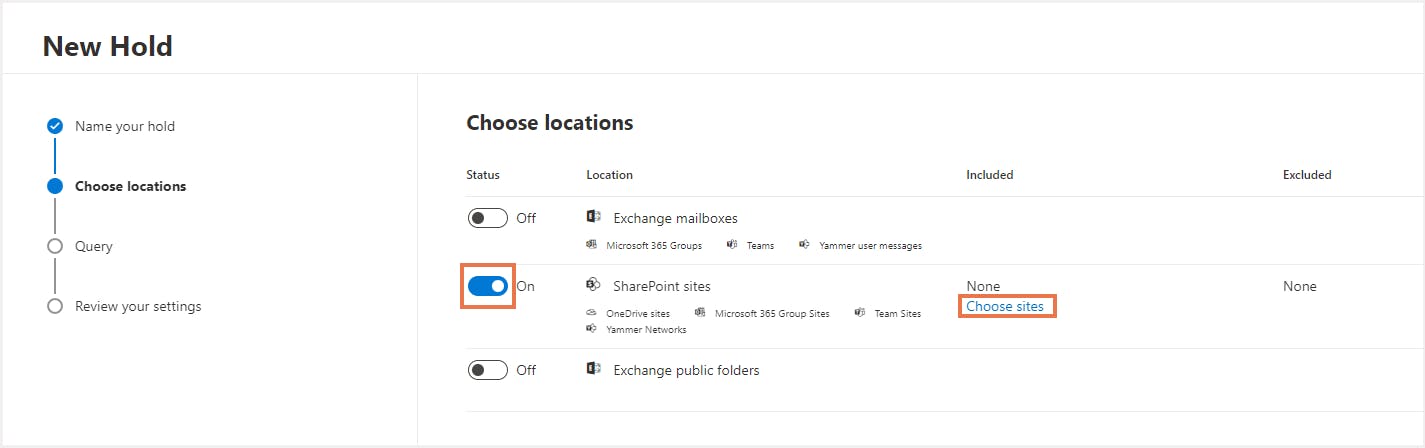
Step 5 Turn on the toggle button next to SharePoint Sites. (OneDrive for business accounts are included under SharePoint sites).
Step 6: To place a hold on specific OneDrive for business accounts, click ‘Choose sites’. The administrator can choose from a list of OneDrive for business site URLs or manually add a specific OneDrive account URL.
Step 7: Add keywords to lookout for.
Step 8: Review the settings and click ‘Submit’.
To know more about difference between retention policies and eDiscovery holds in Microsoft 365, click here.
4.3. Microsoft 365 native backup tool
To ensure data protection and continuity, Microsoft 365 Backup automatically backs up OneDrive, SharePoint, and Exchange Online data at regular intervals. Microsoft 365 Backup allows you to restore OneDrive files and folders to a previously known good state using point-in-time recovery.
4.4. Limitations of native retention methods
- Retention policies and eDiscovery features are available only with E3 and E5 licenses.
- In case of modification or deletion of any OneDrive data retained using retention policies, a copy of the data moves to the preservation hold library. Preservation hold library storage is counted against the total storage quota and businesses will have to purchase additional storage when using retention. Below is a note from Microsoft that highlights the storage implication when using the Preservation Hold Library.
- Unlike third-party backup tools, native retention feature does not come with automated recovery options. In case of a data loss event, administrators can only export the data and restore it manually. Microsoft eDiscovery also lacks the auto-enrollment feature that automatically preserves data belonging to newly added users.
- To retain deleted/suspended user data, organizations need to continue paying license costs.
- OneDrive data retained using eDiscovery becomes inaccessible to the users. Users cannot modify or work on the OneDrive data as long as the hold is in place.
- Microsoft 365 Backup does not comply with the industry-recommended 3-2-1 backup standard endorsed by the U.S. Cybersecurity and Infrastructure Security Agency (CISA). This strategy requires maintaining at least three copies of your data (one primary and two backups), storing backups on two different types of media, and keeping at least one copy offsite to safeguard against events like hardware failure, cyberattacks, or natural disasters.
- Microsoft 365 Backup lacks file and folder-level restore capabilities for OneDrive and SharePoint. Users cannot restore individual items from a specific point in time, limiting recovery flexibility during incidents involving partial data loss or corruption.
5. Retain OneDrive for business files using third-party backup solutions
Third-party backup solutions like SysCloud helps organizations effortlessly back up OneDrive for business data. SysCloud automatically backs up all OneDrive data and allows administrators to restore the data from the backup archives at any time.
Go Beyond Microsoft’s Retention Limits
Explore how SysCloud offers automated backup, unlimited retention, and effortless recovery for OneDrive for Business.
Recommended Content
29 Nov 2024
3 min read
16 Apr 2025
8 min read
26 Oct 2021
6 min read
28 Mar 2025
6 min read
Get actionable SaaS administration insights
We don’t spam. Unsubscribe anytime.
In this article
- Default data retention in OneDrive for business
- Limitations of default retention methods
- Native retention methods
- Retention policies to retain OneDrive for business data
- eDiscovery to retain OneDrive for business data
- Microsoft 365 native backup tool
- Limitations of native retention methods
- Retention with third-party backup solutions

