Categories
In this article
- Retention policies and labels in Microsoft 365
- How retention settings work with content in place
- Retention policy vs. retention label
- Create and apply Microsoft 365 retention labels
- Create a Microsoft 365 retention policy
- Preservation Lock to restrict changes
- The principles of retention
- Limitations of using retention policies & labels as a backup solution
Microsoft 365 Retention Policy and Retention Label: A Complete Guide
28 Mar 2025
6 min read
Anju George
Retention policies and labels at a glance
- Retention policies apply to entire content types, while retention labels can be applied to specific items for more granular control.
- Advanced licenses offer more features but do not include automated recovery options.
- Many organizations believe that they can leverage Microsoft retention policies and retention labels to back up critical data. This is a dangerous misconception that can place a company’s data at risk.
What is the solution?
- SysCloud provides automated backup and advanced recovery options, ensuring comprehensive data protection and compliance with retention requirements.
1. What are retention policies and labels in Microsoft 365?
Proactively comply with industry regulations and internal policies requiring data retention for a minimum period.
Reduce risks of litigation or a security breach by permanently deleting content that is no longer needed
Enhance knowledge sharing by ensuring users work only with current and relevant content
Retain-only: Retain content indefinitely or for a specified duration
Delete-only: Permanently delete content after a specified period
Retain and then delete: Retain content for a set period before permanently deleting it
Refer to the latest Microsoft licensing documentation for up-to-date information on subscription and licensing requirements to use retention labels and policies.
2. How retention settings work with content in place
For SharePoint and OneDrive sites: The copy is retained in the Preservation Hold library.
For Exchange mailboxes: The copy is retained in the Recoverable Items folder.
For Teams and Yammer messages: The copy is retained in a hidden folder named SubstrateHolds which is a subfolder within the Exchange Recoverable Items folder.
Data in the Preservation Hold Library counts against your SharePoint storage quota. The total SharePoint storage limit per organization is set at 1TB plus 10GB x number of licensed Microsoft 365 users in your tenant. If you exceed the limit, you will have to purchase additional storage priced at approximately $200/month/TB. To save on storage costs while retaining data, you can opt for a third-party cloud backup solution, like SysCloud.
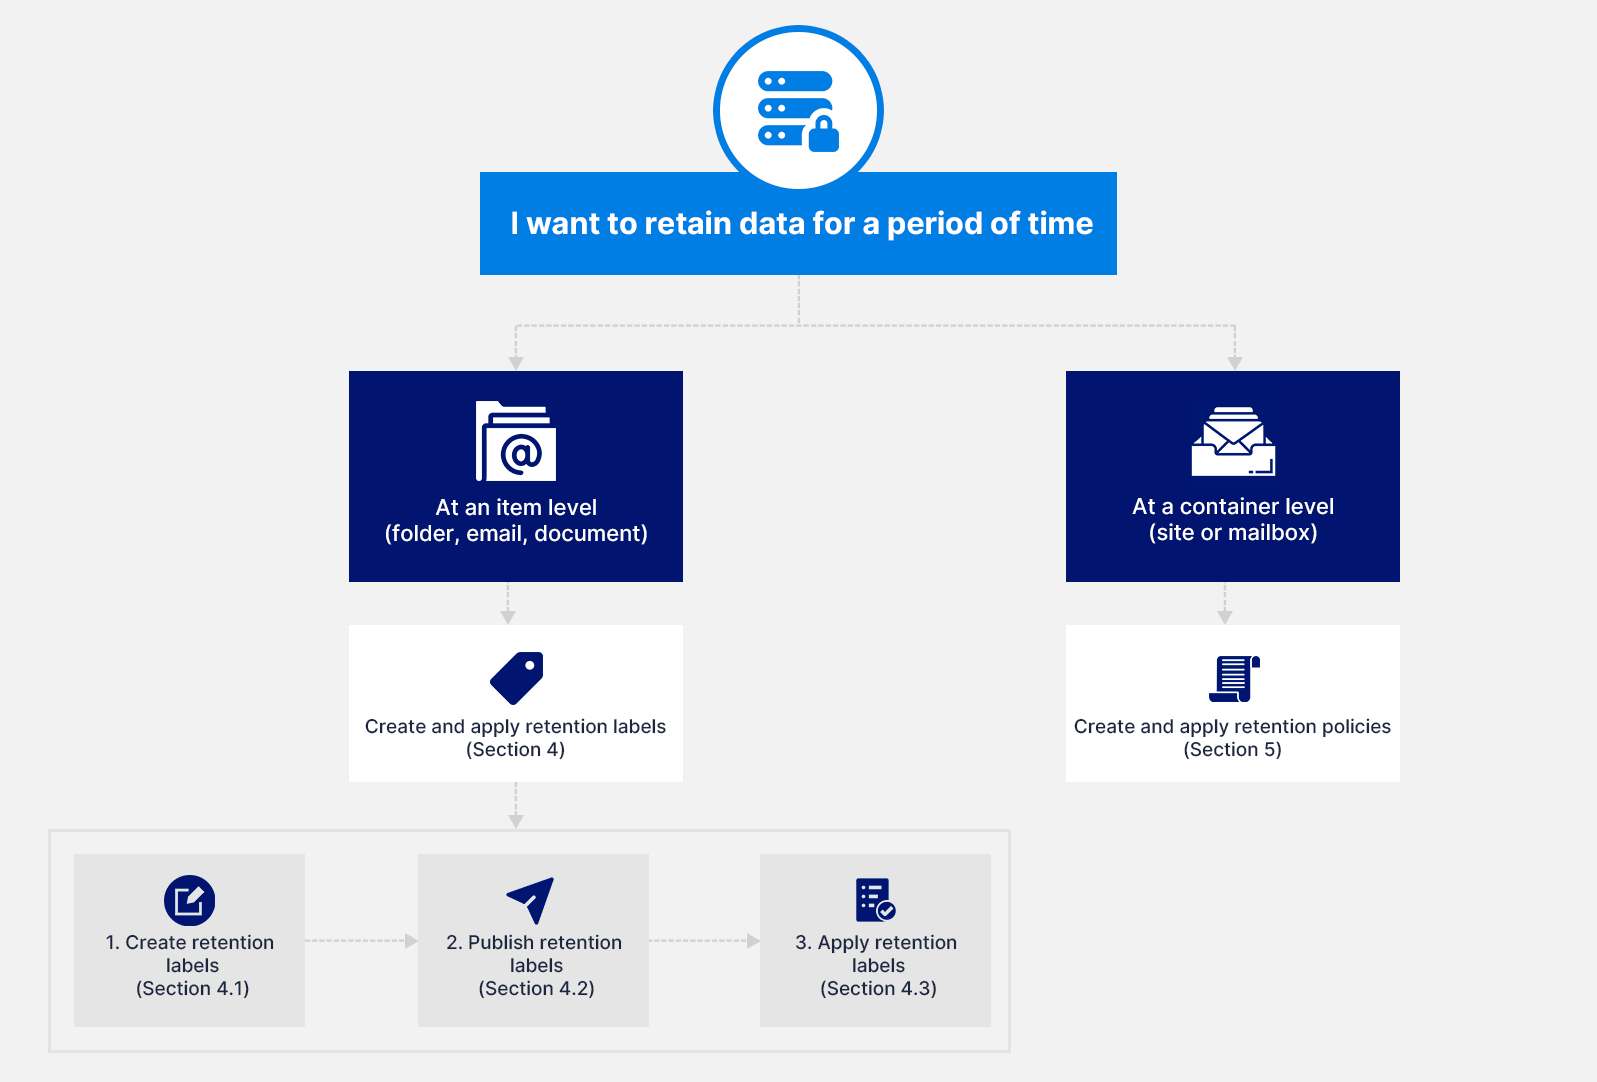
3. Microsoft 365 retention policy vs. retention label
A retention policy is designed to apply retention settings at a container level (such as entire SharePoint sites or Exchange mailboxes), whereas a retention label applies settings at an item level (such as individual folders, emails, or documents). For instance, if an organization requires that all emails within a mailbox be retained for five years, implementing a retention policy on the entire mailbox is more efficient than assigning the same retention label to each email individually. Conversely, if specific emails within that mailbox need different retention periods—say, some for ten years and others for five—applying retention labels at the item level allows for this granular control.
- Start the retention period from when the content was labeled or based on events, in addition to the age of the content or when it was last modified
Use trainable classifiers to identify the content to label
- Apply a default label for SharePoint documents
Support disposition review for the content before it is permanently deleted
Mark the content as a record in the label settings, and always have proof of disposition when the content is deleted at the end of its retention period
To compare retention capabilities of retention policies and retention labels and determine appropriate use cases, refer to Microsoft’s comprehensive comparison table.
4. How to create and apply Microsoft 365 retention labels
4.1. How to create a retention label
Note: To create and configure retention labels, you must be a Global Administrator or a Compliance Administrator.
Step 1: Sign in to the Microsoft Purview portal > Solutions > Data Lifecycle Management card > Retention labels.
Step 2: Select Create a label and follow the prompts to create the retention label.
Step 3: In Create retention label pane, type Label name and Description (for users & admins).

Step 4: Define label settings.

Step 5: Define the retention period.

Step 6: Choose what happens after the retention period

Step 7: Review your configuration on the Review and finish page, then click Create label.
After creating retention labels, they must be published to be available for use across your Microsoft 365 environment. Retention labels can be published to various locations based on their intended function. When you publish retention labels, they are incorporated into a retention label policy, which governs where and how administrators and users can apply these labels to content across different Microsoft 365 services.
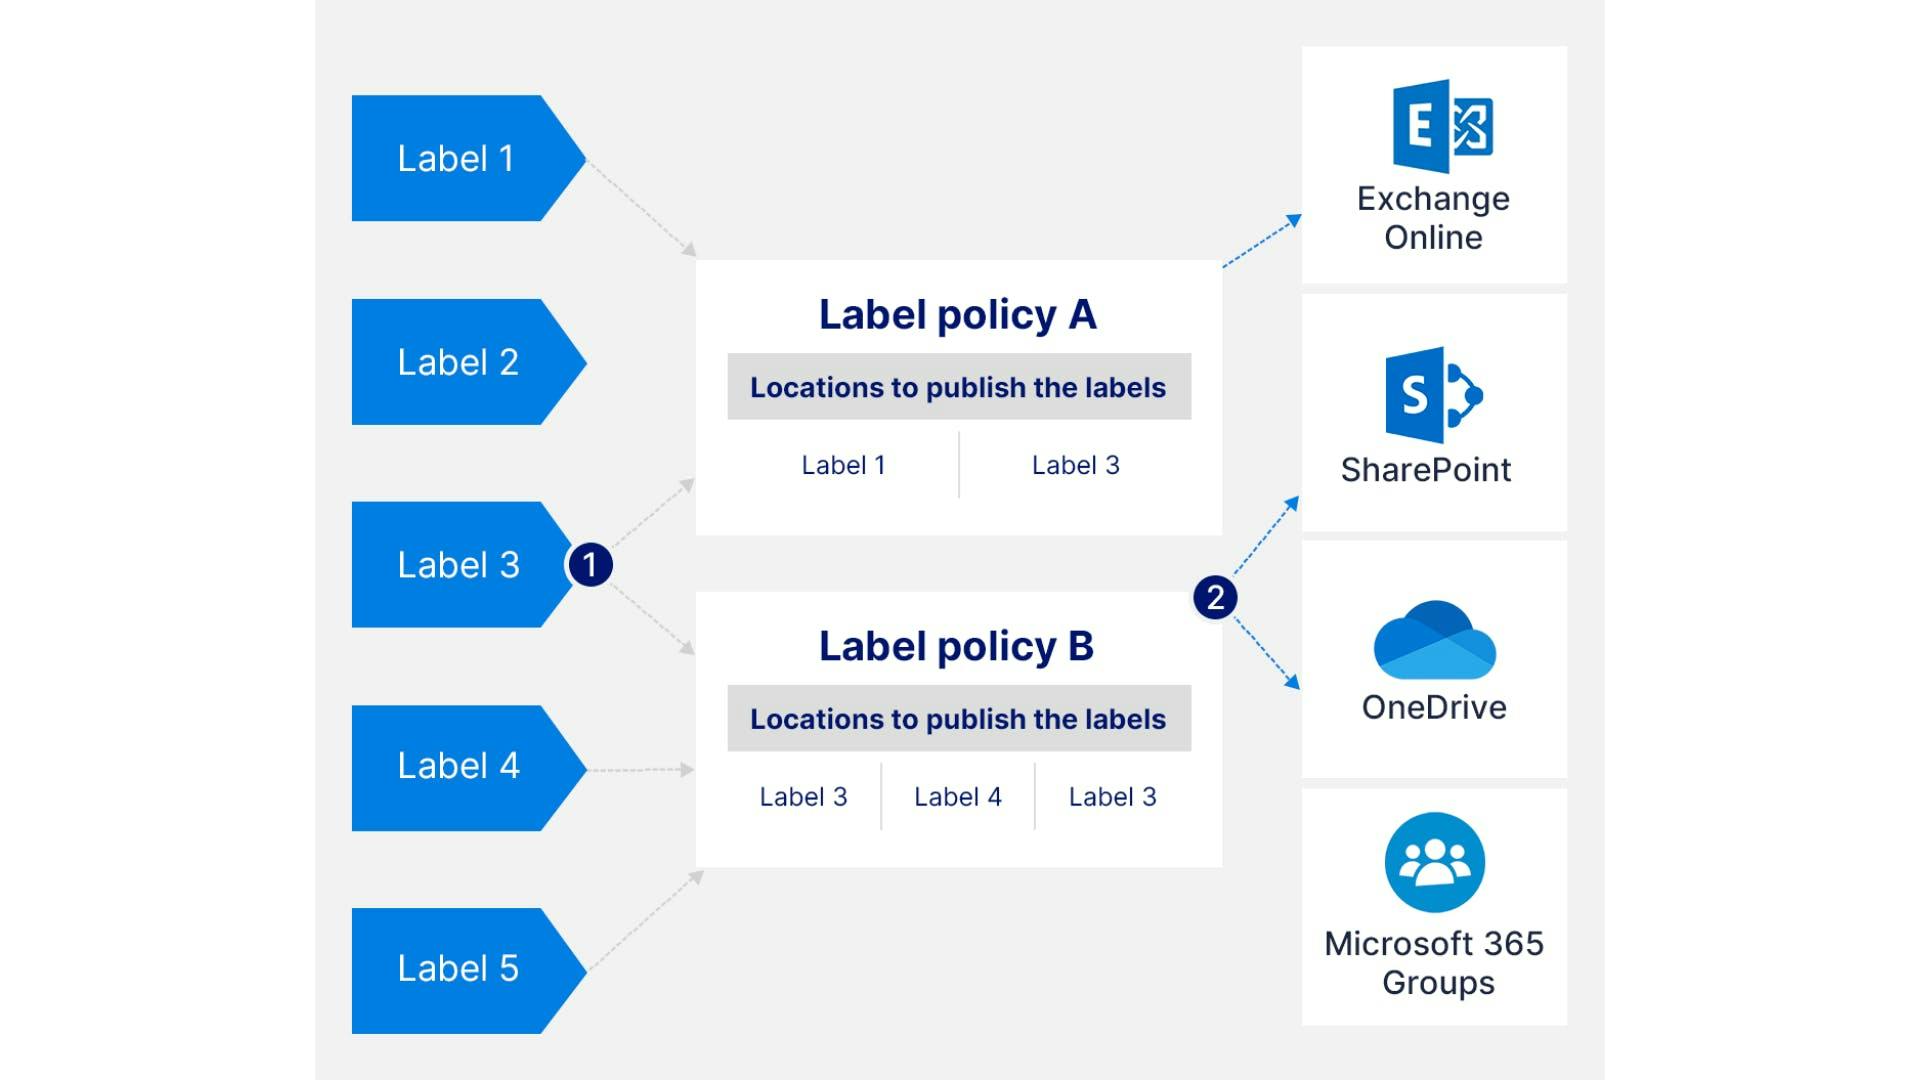
A single retention label can be included in multiple retention label policies. Also, a single retention label policy can include multiple retention labels (except for auto-apply retention label policies which can include only one label).
Note: Retention labels can also be created using PowerShell.
4.2. How to create a retention label policy to publish retention labels
Step 1: In the Microsoft Purview portal, go to Solutions > Data Lifecycle Management > Policies > Label policies. Click Publish labels.
Step 2: Choose labels to publish > Add.

Step 3: On the Assign admin units page, leave as Full directory >Next.
Step 4: Choose if you want the policy to be static or adaptive. Learn more about policy scopes for retention.
Step 5: If Static: On the Choose locations page, toggle on each workload (Exchange, SharePoint, OneDrive, Teams, Yammer). For each, leave default (entire location) or configure specific includes/excludes.
If Adaptive: On Choose adaptive scopes & locations, click Add scopes, pick one+ adaptive scope(s), then select valid locations.
Step 6: Review your policy settings on the Review & publish page. Click Publish.
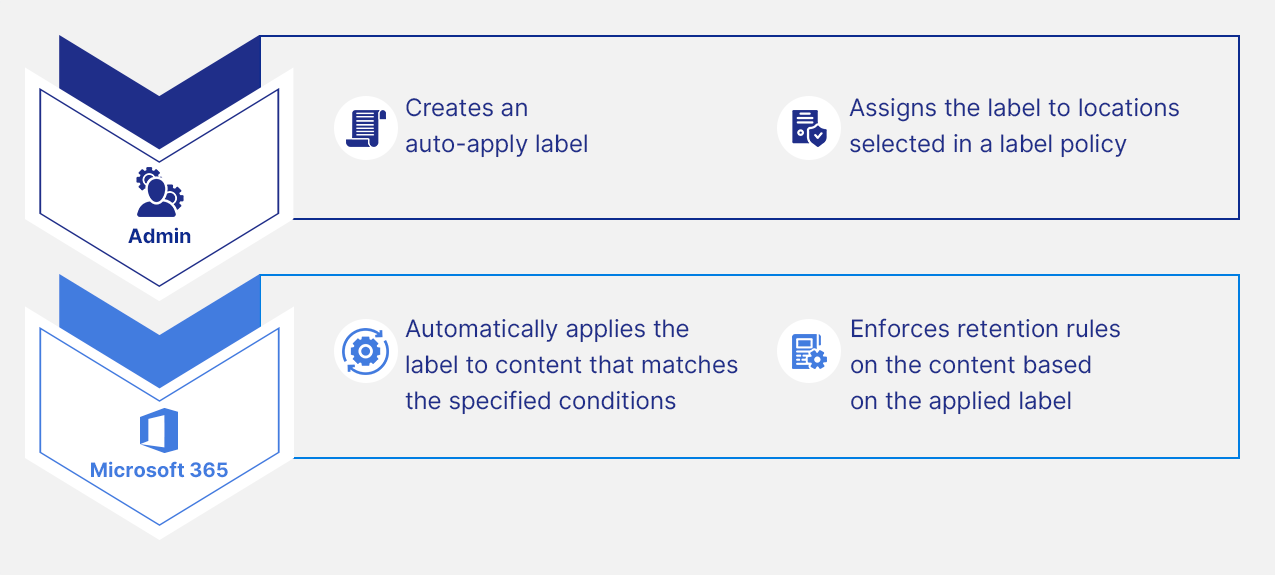
2) Labels that are auto-applied:
Note:
- Once a retention label or label policy is created and saved, the following settings cannot be changed: names for retention labels and their policies, the scope type (adaptive or static), the retention settings except the retention period, and the option to mark items as a record. If the retention period is based on when the items were labeled, the retention period cannot be changed either.
- A retention label can only be deleted if it isn’t included in any label policy, isn’t configured for event‑based retention, and doesn’t mark items as regulatory records.
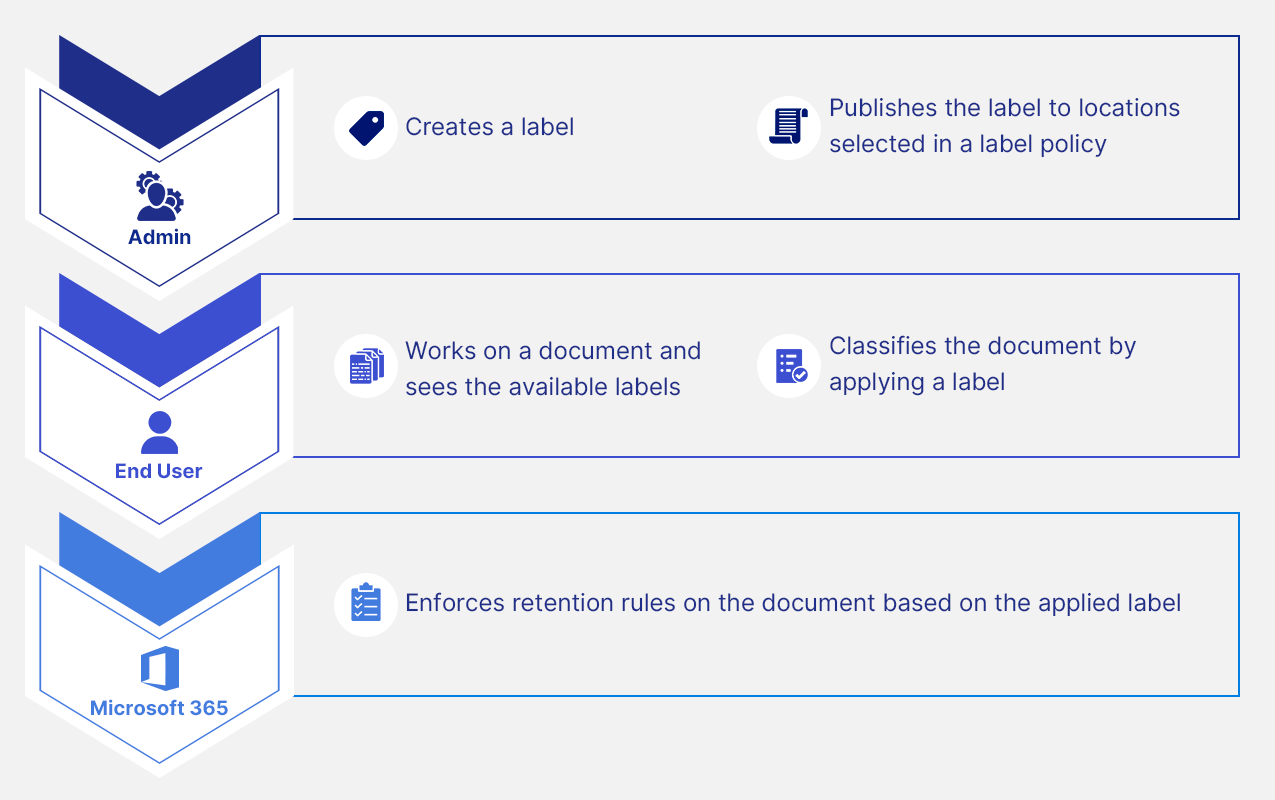
4.3. How to apply published retention labels
Learn how to apply retention labels to each of these locations.
2. After a retention label is published to SharePoint and Outlook, users can apply it as a default retention label so that it's inherited by all unlabeled items. Learn how to do this.
3. Retention labels can be automatically applied to emails by creating rules in Outlook. Learn how to do this.
Note:
- An email or document can have only a single retention label applied to it at a time.
After retention labels are applied to content, content search can be used to find all items that have a specific retention label applied.
A retention label can also be used as a condition in a DLP (Data Loss Prevention) policy. To learn more about how to use a retention label as a condition in DLP policy, click here.
5. How to create a Microsoft 365 retention policy
Note: A global administrator or a compliance administrator alone can create or configure retention policies.
Step 1: In the Microsoft Purview portal, go to Solutions > Data Lifecycle Management >Retention policies.
Step 2: Click + New retention policy, then provide a Name and Description.
Step 3: For the Assign admin units page, keep the default of Full directory.
Step 4: Choose the scope (adaptive or static) for the retention policy. Learn more about policy scopes for retention.

Step 5: If you chose Adaptive in Step 4: Click on Add scopes and select one or more adaptive scopes that have been created. Then, select one or more locations. The locations that you can select depend on the scope types added. Click here to learn more about adaptive scope types, available locations and attributes, and how to configure an adaptive scope.
If you chose Static in Step 4: In the Locations page, select the locations to be included in the retention policy.

Step 6: Configure the retention settings according to your organization’s requirements.
You can choose to:- Retain the content for a specific period or forever- Retain for a specific period and then delete the content- Delete the content after a specific period

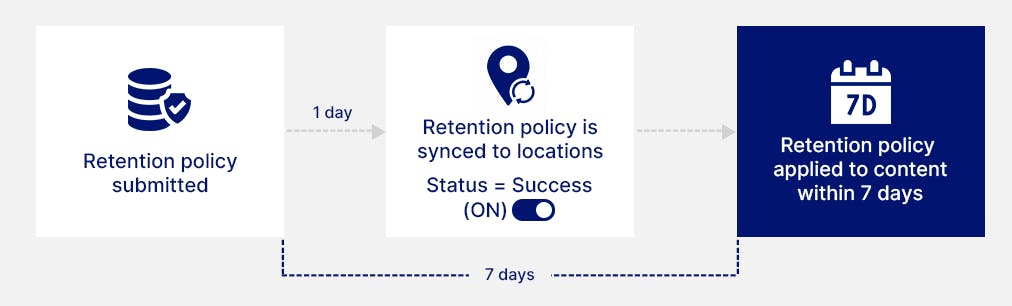
Step 7: Review the settings and click Submit. Your new retention policy will be created.
6. Preservation Lock to restrict changes to retention policies and retention label policies
Preservation Locks can be used to restrict changes to retention policies and retention label policies. A Preservation Lock locks a retention policy or retention label policy so that no one—including a global admin—can turn off the policy, delete the policy, or make it less restrictive. Preservation Locks can be enabled only via PowerShell; enabling this feature is not available in the UI to prevent accidental configuration. Learn how to lock a retention policy or retention label policy using PowerShell
7. The principles of retention: What takes precedence
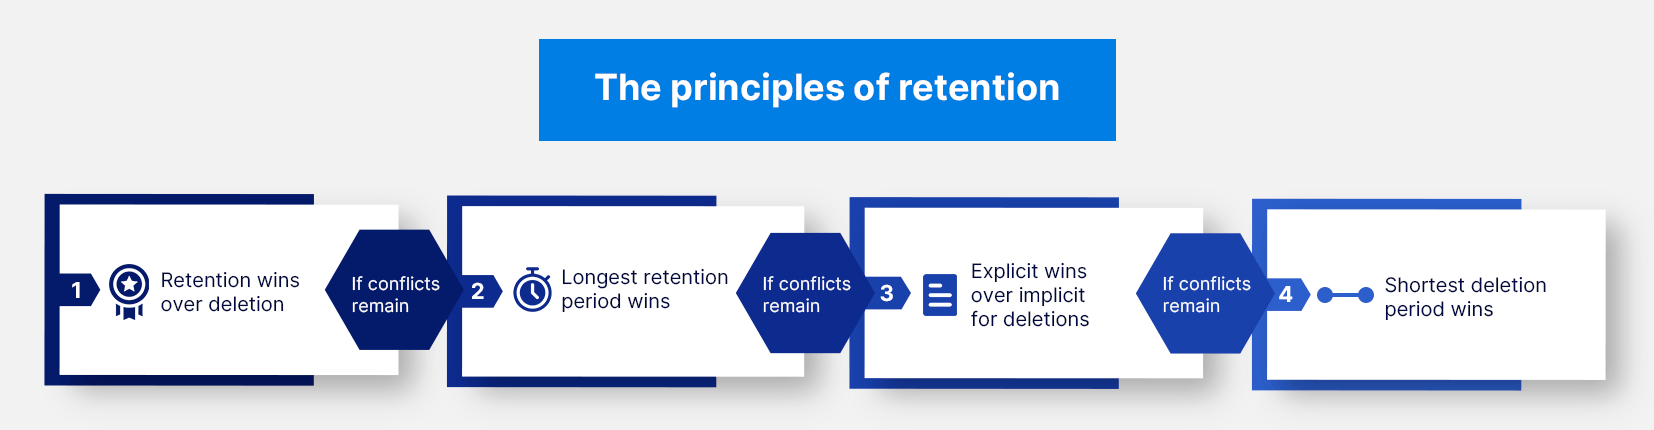
To learn more about how retention conflicts are resolved along with relevant examples, refer to the Microsoft documentation.
8. Limitations of using Microsoft 365 retention policies and labels as a backup solution
- Retained data counts towards your Microsoft 365 storage quota. Each user has a limited storage available. If you delete data to stay within the storage limit, the deleted data cannot be recovered.
Retention policies and legal holds are part of the Microsoft Purview Compliance Center which is only available in senior E3 and E5 plans, that are priced higher than Microsoft (Office) 365 Business plans.
- Retention policies and labels do not cover all the data within Microsoft 365 apps:-For SharePoint and OneDrive: SharePoint membership permissions, sharing and access permissions, and site themes and related settings are not retained.-For Exchange Online: Calendar items, tasks that do not have an end date configured, and themes and related settings are not retained
- A maximum of 10,000 policies can be included in a tenant. This maximum number includes the different policies for retention, and other policies for compliance such as policies for DLP, information barriers, eDiscovery holds, and sensitivity labels. Within this 10,000 policies limit, there are also limits on the maximum number of policies for retention per workload:-Exchange (any configuration): 1,800-SharePoint or OneDrive: (all sites automatically included): 13-SharePoint or OneDrive (specific locations included or excluded): 2,600
There are also limits on the maximum number of items per policy. Learn more
- Unlike third-party cloud backup tools, retention policies and retention labels lack automated recovery features. In the event of data loss, retained data can only be exported offline and need to be restored manually. Restoring a large amount of data will require a lot of manual effort and time.
- Data belonging to deleted user accounts are not retained, so if you need to retain data of employees who left the company, you must continue paying Microsoft for the user licenses.
9. Conclusion
Retention policies and labels provided by Microsoft are necessary for proactive regulatory compliance, to reduce the risk of litigation or security breaches, and to ensure that users work with only current and relevant content. Nevertheless, they are not designed for the purpose of backup and restore, and therefore, have serious limitations as a backup solution. Third-party cloud backup applications like SysCloud are better options to back up your Microsoft 365 data.
SysCloud Backup for Microsoft 365 provides automated, secure cloud backup for all your Microsoft 365 apps. With SysCloud, administrators can easily recover from accidental deletions or ransomware attacks and identify compliance gaps in the backup archives.
Recommended content
2 May 2024
8 min read
29 Nov 2024
3 min read
26 Oct 2021
6 min read
Get actionable SaaS administration insights
We don’t spam. Unsubscribe anytime.
In this article
- Retention policies and labels in Microsoft 365
- How retention settings work with content in place
- Retention policy vs. retention label
- Create and apply Microsoft 365 retention labels
- Create a Microsoft 365 retention policy
- Preservation Lock to restrict changes
- The principles of retention
- Limitations of using retention policies & labels as a backup solution

