Categories
In this article
- Why do you need eDiscovery?
- What are the data sources covered by Microsoft eDiscovery?
- What is Microsoft 365 eDiscovery (Standard)?
- What is Microsoft 365 Advanced (Premium) eDiscovery?
- Access permissions in Microsoft 365 eDiscovery
- Is eDiscovery a backup solution?
A Primer to Microsoft 365 eDiscovery Solutions
15 Apr 2025
8 min read
Himanshu
Article at a glance
- eDiscovery searches in Microsoft 365 may miss critical data due to complex query parameters and storage limitations, increasing the risk of incomplete legal or compliance records.
- Native eDiscovery tools lack automation for continuous data capture, which may result in gaps in the data collection process.
Read more
1. Why do you need eDiscovery?
i. Legal compliance: Organizations in the U.S. must comply with the Federal Rules of Civil Procedure (FRCP), which govern how evidence, including digital data, must be handled during civil lawsuits. In 2006, the FRCP was updated to include Electronically Stored Information (ESI) as discoverable material, this means companies must be able to produce emails, messages, and documents when requested in a legal context.
ii. Managing ESI: In today’s digital-first environment, businesses are consuming and generating data at an unprecedented pace. In fact, data usage among small and mid-sized businesses has now exceeded traditional thresholds, with many surpassing 50 TB to 100 TB of stored data as operations become increasingly cloud-driven and distributed.
2. What are the data sources covered by Microsoft eDiscovery?
Emails and public folders in Exchange Online
Files and documents stored in SharePoint Online and OneDrive for Business
Group content from Microsoft 365 Groups
Messages and files from Yammer (in enterprise mode)

When it comes to Microsoft Teams, the data is stored across multiple places:
Channel messages and shared files are saved in the team’s mailbox and SharePoint site.
Private channel content is kept in separate, dedicated mailboxes and SharePoint sites.
1:1 and group chats are stored in each participant’s mailbox, while files shared in these chats go into the sender’s OneDrive.
3. What are the types of eDiscovery solutions available?
Microsoft 365 includes a few built-in tools under the Microsoft Purview Portal for eDiscovery which include Content Search, eDiscovery (Standard), and eDiscovery (Premium).

Content Search is the simplest of the three. It allows administrators to run keyword-based searches across Microsoft 365 services like Exchange Online, SharePoint, and OneDrive. While it’s useful for locating specific content quickly, it doesn’t offer case management features or legal hold capabilities.
eDiscovery (Standard) offers some additional structure. With it, users can create cases, apply legal holds to preserve data, and export content for offline review. It can support internal audits or low-risk investigations but may require manual effort to manage and track the entire process.
eDiscovery (Premium) includes some more advanced features that may be helpful in larger or more complex scenarios. This version introduces tools like review sets for organizing search results and basic analytics (like duplicate detection).
3.1. What is Microsoft 365 eDiscovery (Standard)?
3.1.1. How to create a eDiscovery (Standard) Case?
Step 1: Go to the Microsoft Purview portal and sign in with an account that has been assigned eDiscovery permissions.
Step 2: In the left navigation menu, select “Standard Cases” under “eDiscovery”.

Step 3: Select the case to navigate to the case page and take further action.

Step 4: Provide a unique name for the case and optionally include a description.

Step 5: Click Save to create the case.
3.1.2. How to run an eDiscovery search in a eDiscovery (Standard) case?
Step 1: Open your case from the eDiscovery (Standard) dashboard.
Step 2: Click “Searches'' from the top menu bar. Click “+New Search”.

Step 3: Type a name and description (optional) for the new search. Click “Next”.
Step 4: Choose the location to search for content. Example: - Specific users, groups, or teams under Exchange mailboxes - Specific sites and OneDrive accounts or add the URL for a Microsoft Team, Office 365 Groups, or Yammer Groups SharePoint site. Click “Next”.

Step 5: Add conditions for the search if needed. This could include specific keyword(s) and add conditions to search for the keyword. Click “Next”.

Step 6: Review the search and click “Submit”. Once the content search run is complete, administrators can take further action like “Edit search,” “Rerun search,” etc. They can also export the search results as a .csv or a compressed .zip file by clicking “Export results”.

3.1.3. How to create a hold in a Core eDiscovery case?
Step 1: From the eDiscovery (Standard) dashboard, open your case.
Step 2: Select the “Holds” tab, then click “+ Create”.
Step 3: Give the hold a name and optional description, then click Next.

Step 4: Select the locations you want to preserve content from (e.g., mailboxes, SharePoint sites, OneDrive accounts).

Step 5: Optionally, you can add a query to apply a targeted hold. This preserves only content matching specific criteria.

Step 6: Review the settings and click “Submit”. The hold will be created based on the chosen location or the query and or condition.

Once the hold is in place, it can be removed by an administrator whenever needed. When a hold is removed, Microsoft adds a 30-day delay hold as a grace period before any data is permanently deleted. You can find the most up-to-date steps and details in Microsoft’s official guide to getting started with eDiscovery (Standard).
3.2. What is Microsoft 365 Advanced (Premium) eDiscovery?
Microsoft 365 eDiscovery (Premium) enhances the capabilities of Core eDiscovery by providing a comprehensive, end-to-end workflow for managing internal and external investigations. It enables organizations to identify, preserve, collect, review, analyze, and export content relevant to legal cases or compliance requirements.
eDiscovery (Premium) also helps manage custodians and legal hold notification workflows to communicate with custodians involved in any specific case.
Advanced eDiscovery Glossary:
Custodian – Custodians are users/people whose content an organization wants to specifically search for and gather as evidence in any legal case.
Non-custodial data sources – When a new collection is created, administrators can add non-custodial data sources. These could be sites or groups or any other sources that need to be included in the search.
Review sets – In Advanced eDiscovery, data can be added to review sets where it can be reviewed, analyzed, tagged, and exported.
Collections – Using collections, administrators can search for and collect live data from the Microsoft data sources.
3.2.1. Advanced eDiscovery and EDRM

3.2.2. How to create an eDiscovery Premium case?
Step 1: Go to the Microsoft Purview portal and sign in.
Step 2: Click “Premium Cases” under eDiscovery from the left-hand side menu bar.
Step 3: Click “Cases” on the menu bar on the top and click “+ Create a case”.

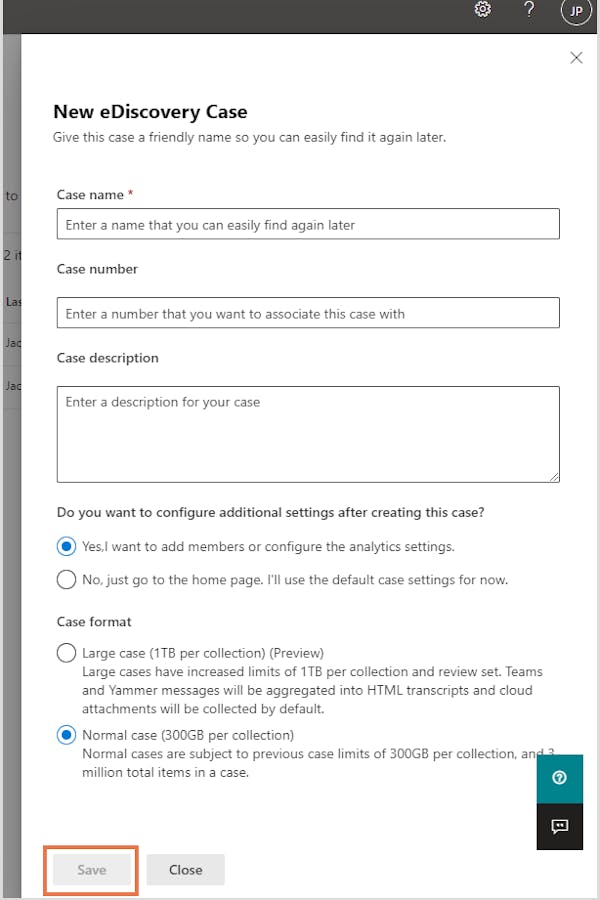
Step 4: Enter a case name, case number, and a description (optional). Administrators can further add members to configure the analytical settings related to the case and the format. Click "Save".
3.2.3. How to create collections in an eDiscovery Premium case?
Step 1: Go to the Microsoft Purview compliance portal and select Advanced eDiscovery from the left-hand menu.
Step 2: Click “+ Create a case” or choose an existing case. Click “Collections” on the top menu bar and click “+ New collection”.

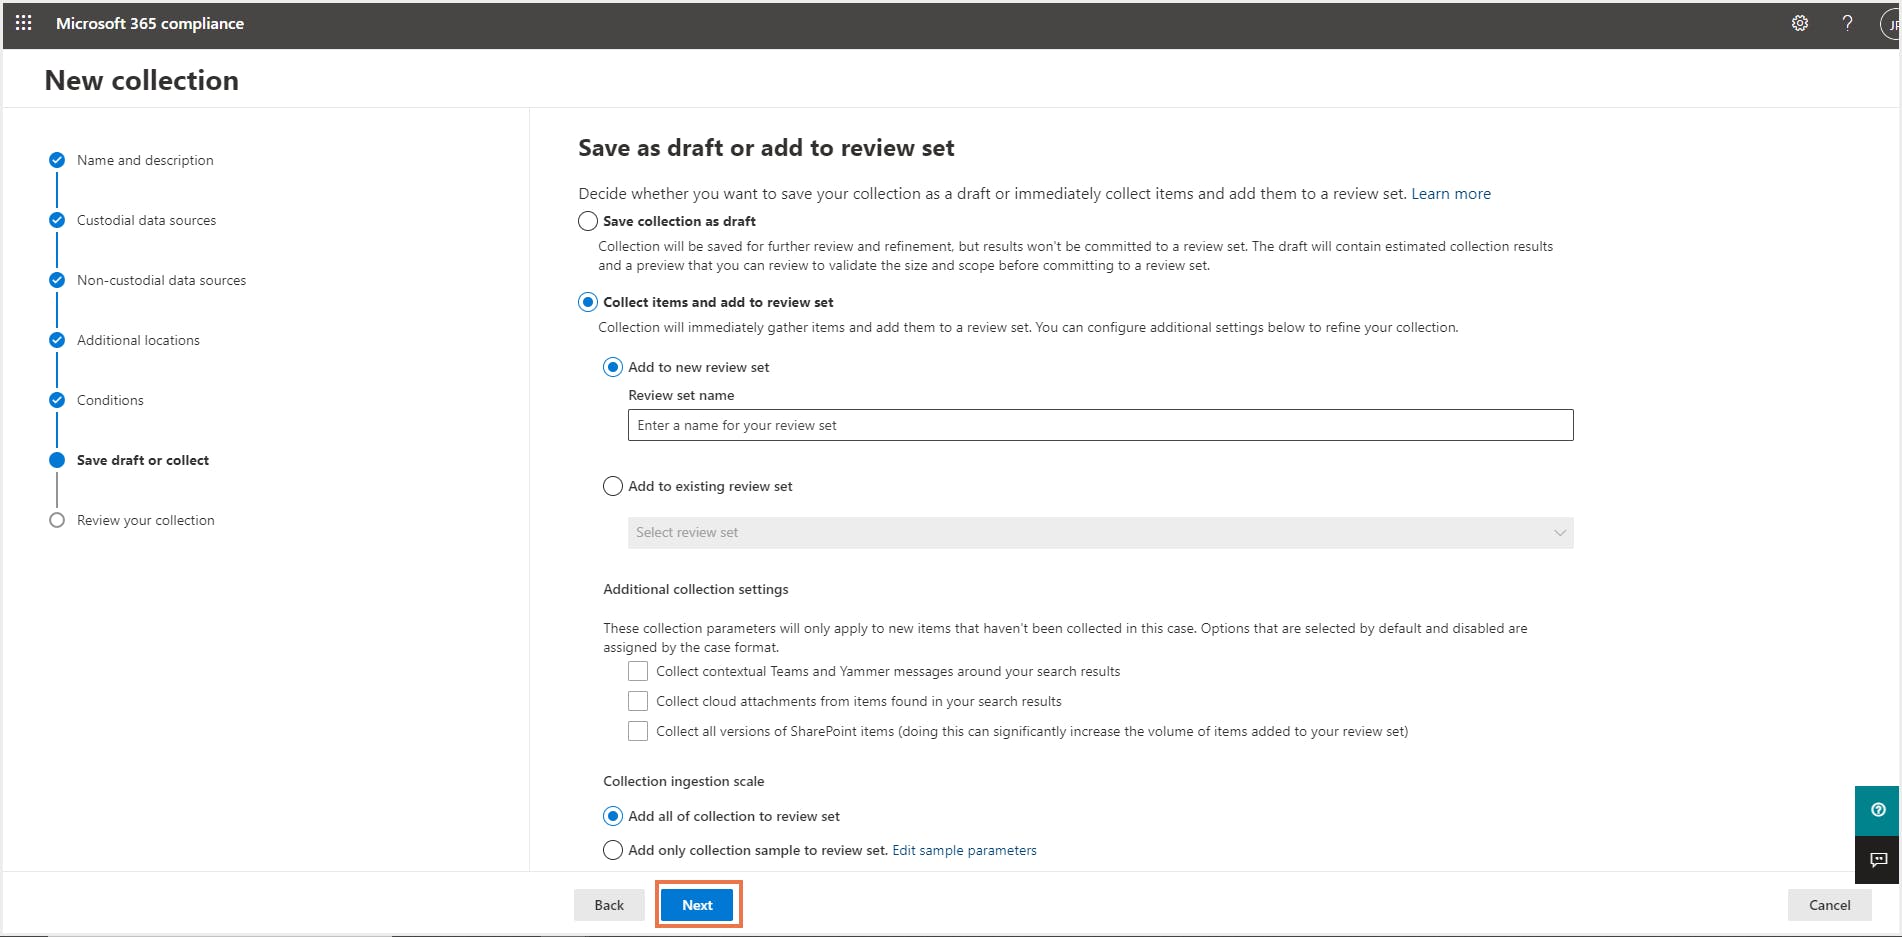
Step 3: Enter the name and description (optional) of the collection, add custodians, non-custodial data sources, additional locations, conditions for the collection, save the collection as draft or add it directly to a review set. Admins can review the collections once the collection process is done.
3.3. Access permissions in Microsoft 365 eDiscovery
eDiscovery Manager: An eDiscovery manager can only manage the case that they create. They can create and manage Core and Advanced eDiscovery cases, create case holds, run searches, preview, and export search results, add and remove members, and access case data.
eDiscovery Administrator: An eDiscovery administrator can perform all the tasks that the eDiscovery manager can. Additionally, an eDiscovery administrator can access all the Core and Advanced eDiscovery cases listed in the compliance center.

The sub-groups can then be edited individually to add users to either of the roles by navigating to Settings> Role Groups> eDiscovery Manager> Edit. To learn more about roles and permissions in eDiscovery read the official support article from Microsoft.

4. Is eDiscovery a backup solution?
To know more about how eDiscovery is different from a third-party cloud backup tool, click here.
Ensure Seamless Data Protection and Business Continuity!
Use SysCloud to back up all the Microsoft 365 apps with unlimited retention! Easily locate emails and documents from your backup archives using smart search and restore data from any point-in-time backup snapshot.
Recommended content
15 Apr 2025
4 min read
15 Apr 2025
5 min read
26 Oct 2021
6 min read
Get actionable SaaS administration insights
We don’t spam. Unsubscribe anytime.
In this article
- Why do you need eDiscovery?
- What are the data sources covered by Microsoft eDiscovery?
- What is Microsoft 365 eDiscovery (Standard)?
- What is Microsoft 365 Advanced (Premium) eDiscovery?
- Access permissions in Microsoft 365 eDiscovery
- Is eDiscovery a backup solution?

