Categories
In this article
- What happens when a Google Calendar event gets deleted?
- Recover deleted Calendar event from Trash
- Recover Calendar event from Calendar exports
- Recover using Google Vault
- Recover from SysCloud backup archives
Recover Deleted Google Calendar Events: A Complete Guide
22 Apr 2025
5 min read
Gopika Krishnan
Article at a glance
- Deleted Google Calendar events are only recoverable within the trash for 30 days; beyond this period, they are permanently lost.
- Google Workspace does not offer advanced recovery tools for Google Calendar, making it challenging to restore accidentally or maliciously deleted events.
Read more
With over 500 million users per month, Google Calendar helps employees to plan out their workdays, organize tasks, set up appointments, and sync up with colleagues. Losing a calendar event or access to Calendar can have a significant impact on productivity.

What happens when a Google Calendar event gets deleted?
However, there are ways to ensure a safe copy of Google Calendar data is always available to be accessed and restored. Click here to learn more about backing up Google Calendar events.
Note: Anyone who has "Make changes to events" or "Make changes AND manage sharing" permission for Calendar can delete events and see and restore events from that calendar's trash.
Recover deleted Google Calendar event from Trash
Step 1: Visit Google Calendar.
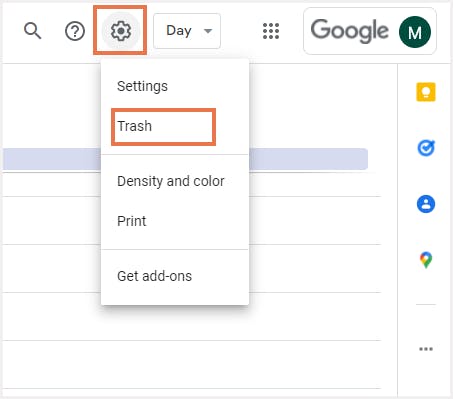
Step 2: Click the settings icon and then click “Trash” from the drop-down menu.

Step 3: In the Trash folder, click the Restore icon next to the event you want to restore. If there are multiple events that need to be restored, select the specific events and click the "Restore all selected" icon on top.

Limitations of restoring deleted Google Calendar events from Trash
- Google Calendar events can only be recovered from Trash within 30 days of deletion. After this period, they are permanently deleted and cannot be retrieved.
- If a user empties the Trash, the events are deleted permanently.
Recover Calendar event from Calendar exports
Click here to learn how to export Google Calendar data.
Step 1: Visit Google Calendar.
Step 2: Click the settings icon on the top panel and click “Settings”.

Step 3: In the Settings page, click “Import & Export” and then click “Import” from the drop-down menu under “Import & Export”.

Step 4: Click the “Select file from your computer” option.
Step 5: Choose the calendar to which the events need to be imported to.
Step 6: Click “Import”.

Limitations of recovering deleted Calendar data from Calendar exports
- The effectiveness of this method depends on how recent your exported data is. If the export is outdated, you may not recover all the lost events.
- The process of exporting and then importing calendar data can be time-consuming, especially if you have a large calendar with many events.
- The process is not automated, meaning you need to remember to regularly export your Calendar events for this method to be effective in recovery scenarios.
- The import/export feature does not support incremental backup. Each time you export the calendar, it's a full export of all events at that time, which might not be efficient for frequent backups.
Recover Deleted Calendar Data Using Google Vault
Step 1: Log in to Google Vault using your admin account.
Step 2: Go to the Matters section and open or create a new matter.
Step 3: Click on Search > Calendar.
Step 4: Use filters like date range, email address, or keywords to narrow down your search.

Step 5: Click Search to view available calendar items, including those that were deleted but are still under retention.
Step 6: Use the Export option to download the results.

Limitations of recovering deleted Calendar data from Vault
- Vault does not offer an option to restore exported events back into the original user calendars. Any recovery has to be handled manually via import, which is time-consuming and error-prone.
- Vault only retains calendar data if it's covered by an active retention rule at the time of deletion. If no rule was in place, deleted calendar events cannot be recovered.
- Vault is built for legal holds and compliance, not operational restore. Recovering calendar data for just one user—or one specific meeting—can be unnecessarily complex and inefficient.
Recover deleted Google Calendar events using SysCloud
Given the limitations of native recovery options, third-party cloud backup tools like SysCloud are reliable options to back up and restore Google Calendar data.
SysCloud automatically backs up an organization’s Google Workspace data including Google Calendar events. SysCloud also has an on-demand backup option that allows businesses to run a backup job whenever needed. The backed-up events can be easily restored from the SysCloud backup archives.
Recommended content
3 Jan 2022
5 min read
19 Jan 2022
4 min read
5 Jan 2022
7 min read
Get actionable SaaS administration insights
We don’t spam. Unsubscribe anytime.
In this article
- What happens when a Google Calendar event gets deleted?
- Recover deleted Calendar event from Trash
- Recover Calendar event from Calendar exports
- Recover using Google Vault
- Recover from SysCloud backup archives

